This new guide will show you how to switch your site from HTTP to HTTPS.
In this guide you will learn why it’s important for you take this step; how it will benefit your SEO and the step by step process to use when switching to HTTPS and implementing an SSL.
The best part?
In 9 easy steps YOU will convert your existing website from HTTP to HTTPS in less than 1 hour!



Chapter 1Benefits of SSL Implementation
In this chapter we are going to be looking at the benefits you will get from switching your site from HTTP to HTTPS.
The search engines (especially Google) are always moving the goal posts and its important to stay ahead of the trend.
Moving to SSL can improve your SEO, site speed and also increase trust amongst your website visitors.
Lets have a look at the potential benefits…

Moving from HTTP to HTTPS for SEO
One of the biggest search engines, Google, announced that having an SSL (HTTPS) website would be considered an on-page SEO ranking signal from as long ago as 2014.
Reading "HTTPS as a ranking signal": http://t.co/nEjcGhm8bJ
— Matt Cutts (@mattcutts) August 7, 2014
Many experts in the industry argue that this wouldn’t correlate to a significant boost to your websites ranking it is nevertheless a ranking signal which is one of the 200+ signals Google’s algorithm uses to position your website in the search engine results.
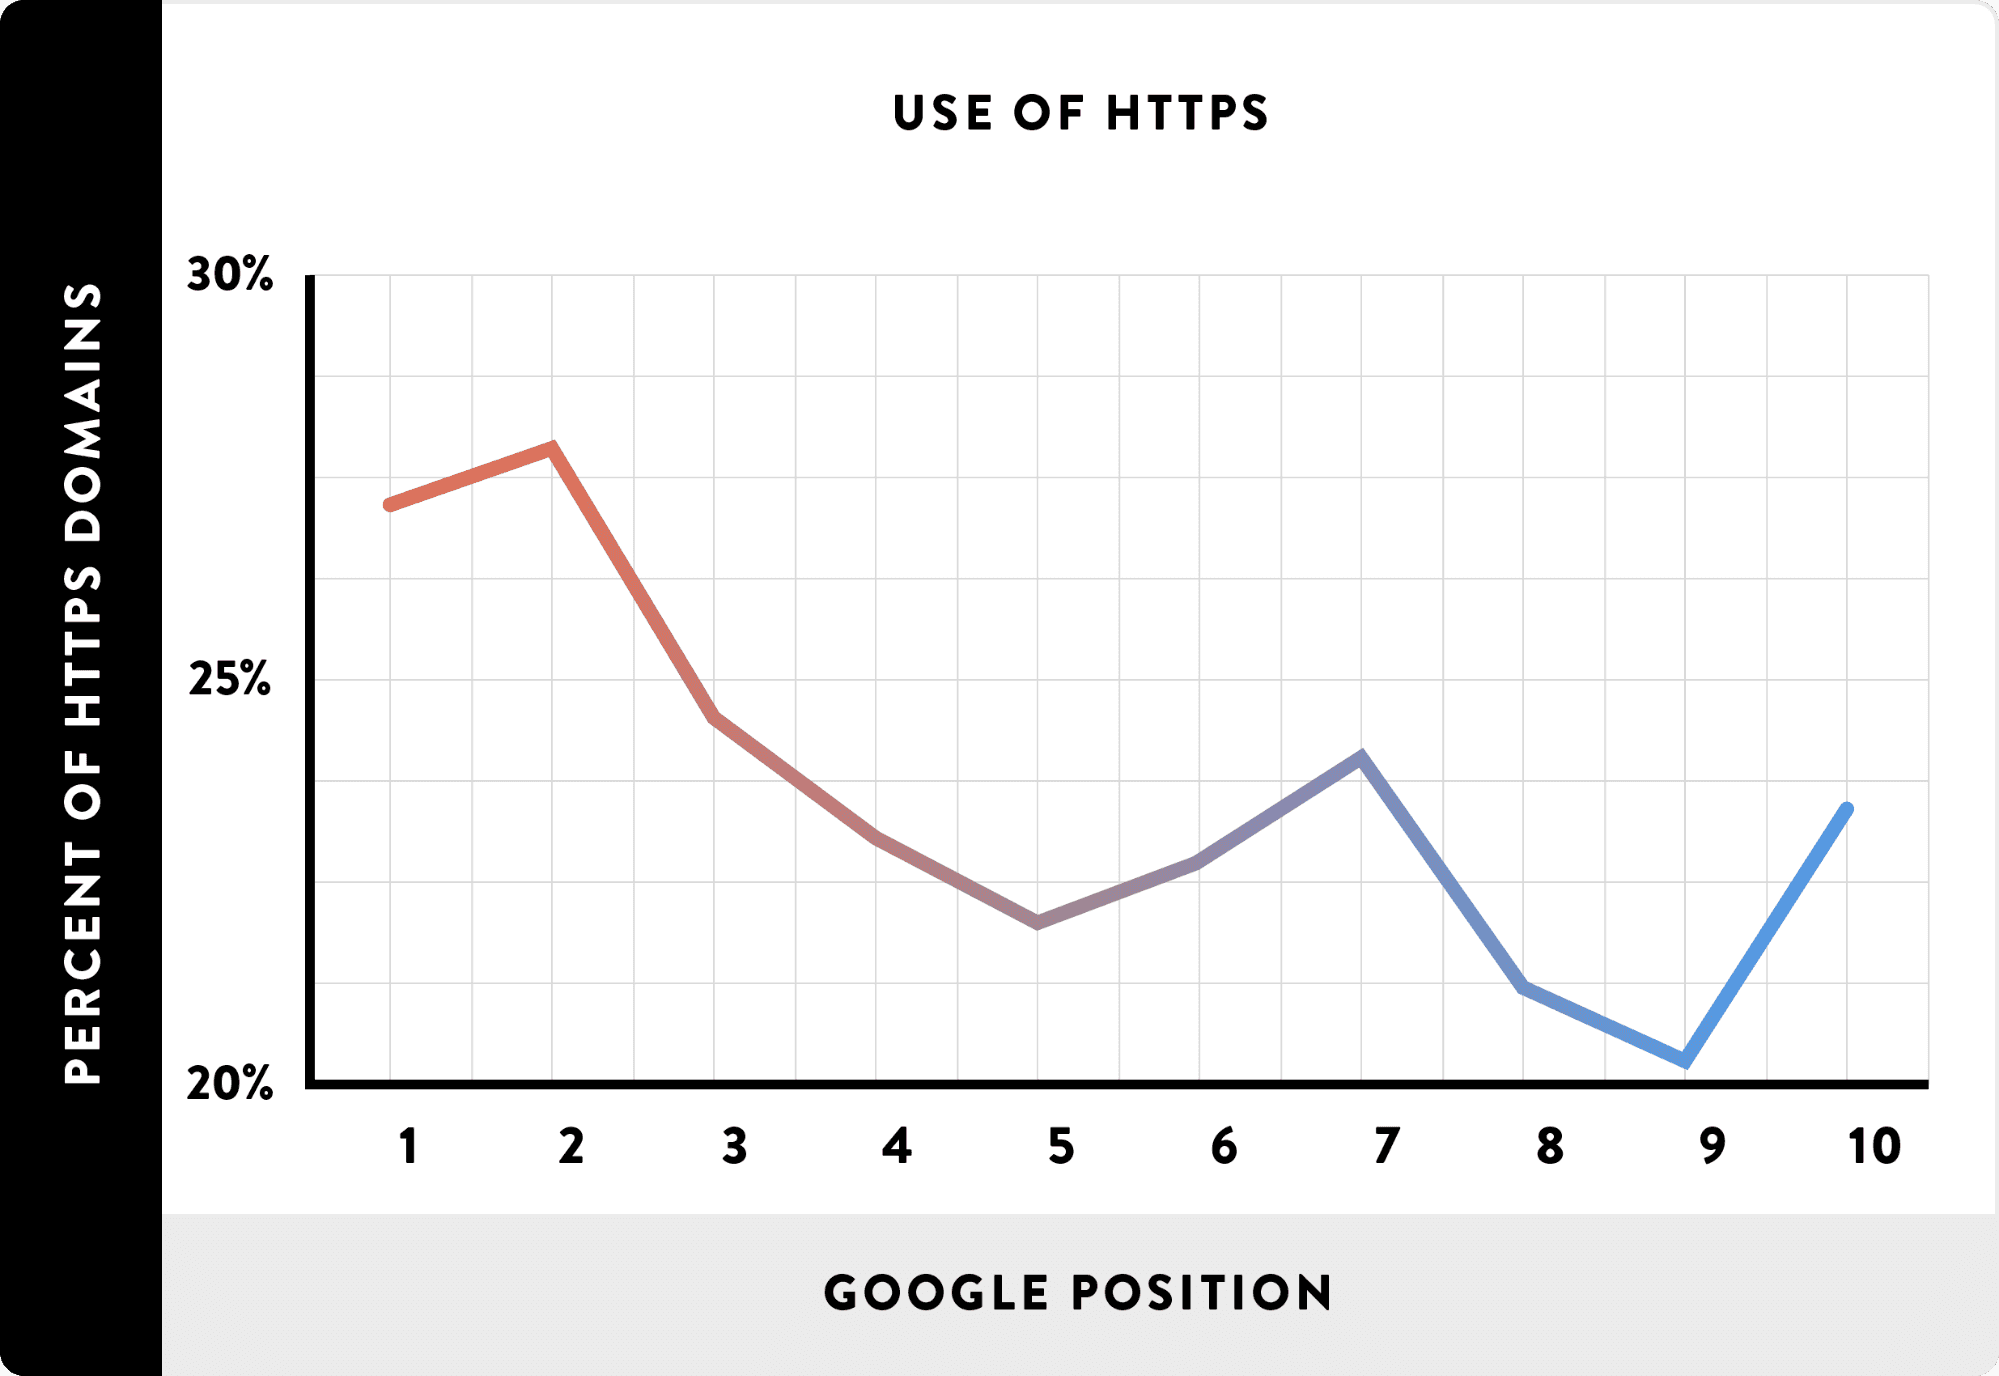
Google’s 1st page search results now contain more than 50% of websites that are on HTTPS and this figure is only growing. An analysis of 1 million Google search results conducted by Brian Dean in conjunction with SEMRush, Ahrefs, SimilarWeb and MarketMuse found that having an SSL enabled website is moderately correlated with higher search engine rankings.
An interesting blog post on SEMRush spoke to digital marketers from a range of industries and countries for their opinions on switching to HTTPS.
Although they agree that it doesn’t have a big impact on your websites rankings it does clearly indicate your site as trustworthy and secure. It’s worth a read to see what experts have to say about HTTPS and the benefits it can give your organic search results.
Combine this with the fact that in January 2017 introductions of the new FireFox and Google Chrome browsers are now show warning errors and an ‘i’ symbol in the browser address bar for HTTP websites that have any type of forms. Be it contact forms, signup forms, comment forms or anything of that nature, that don’t use SSL.
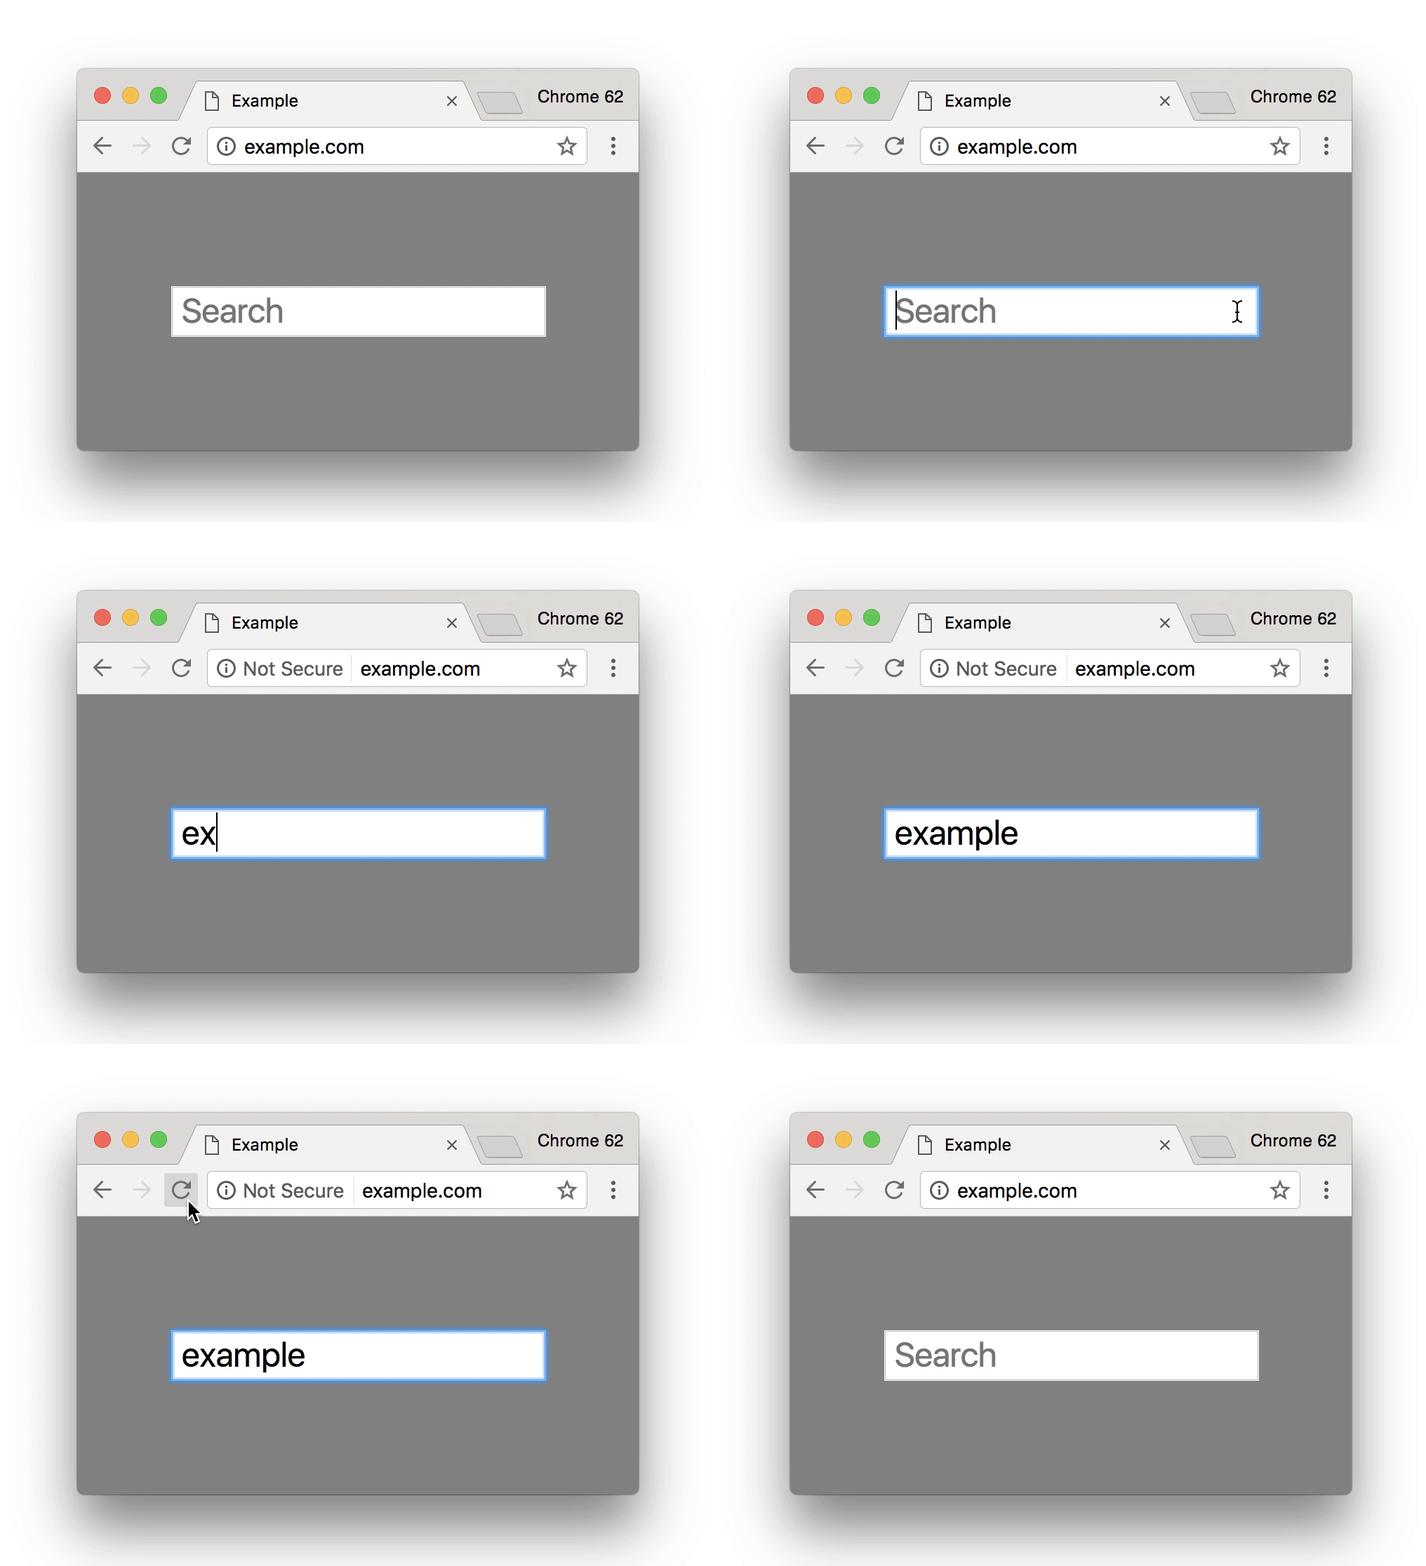
All popular browsers are now showing deterring messages on sites that have not made the transition over to HTTPS potentially driving customers away from your website.
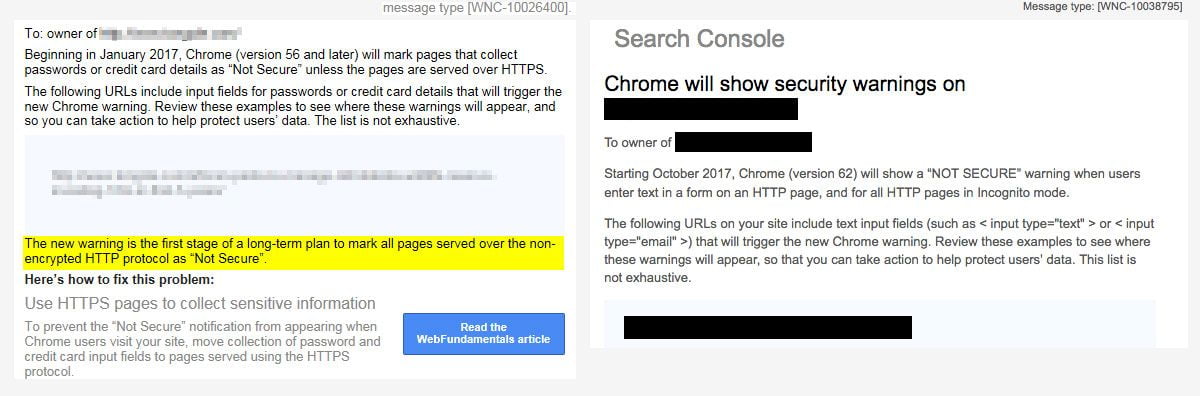
According to Sucuri a leading security website, only a few months ago Google had actively started to blacklist non-https websites that contained any type of form.
Last month Google also started to send out notices for HTTP only sites that from Chrome browser version 56/62 any type of website with any kind of text input will require an SSL certificate to avoid any errors or ‘not secure’
Another benefit of having a HTTPS enabled website (Hypertext Transfer Protocol Secure) is that it provides a secure connection to users on the web pages where they may share their personal data with you. When a user shares private information, like credit card details, HTTPS adds an extra layers of protection.
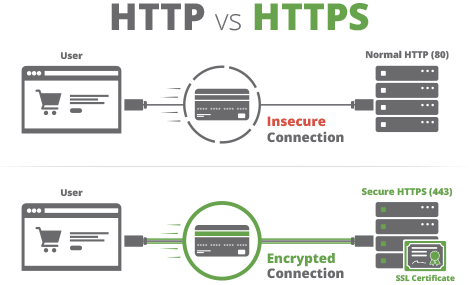
It’s become increasingly more important to ensure that you’re website is secure and trustworthy. Implementing an SSL is highly recommended (if you have done a technical SEO audit it’s most likely 1 of the big issues highlighted for you to fix), you’ll get a slight SEO boost and it will provide more trust to end users.
Chapter 2What types of SSL Certificates are there?
There are a different range of SSL (Secure Socket Layer) certificates available in the market ranging from £10 to £300+. The type of SSL you need will depend on your requirements. For example the validation type (more on this below) and do you need to secure multiple domains?
SSL certificates have different validation levels. The most basic of which are a domain validated SSL to extended validated SSL’s.
Domain Validated SSL Certificates
This is the lowest level of SSL certificate you can get. The certificate authority simply checks that the organisation applying for the certificate has authority over the domain in question. Verification is generally done via email and to validate you have authority you can be (a) requested to upload a file to your domain or (b) update your DNS settings. Its relatively simple, doesn’t require any human intervention and can take a few minutes to a couple of hours for the certificate to be issued.
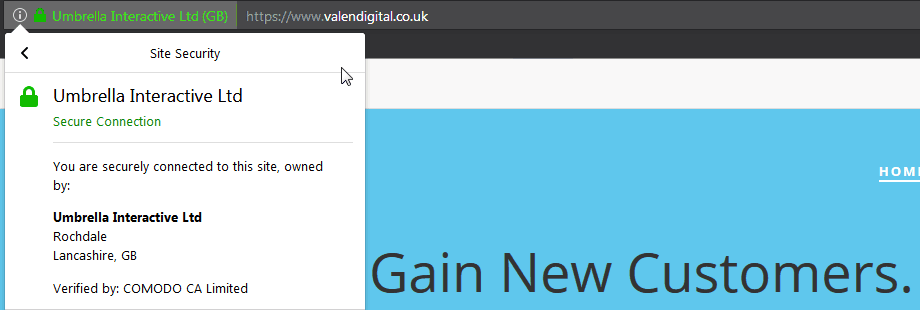
Once installed, the browser will show the green padlock to users confirming that they have a secured HTTPS connection to your website like our SEO Rochdale website.

Organization Validated SSL Certificates
Similar to standard certificates with the exception that humans are involved. Although your organisation is not checked deeply, it is checked to verify that you are indeed an organisation. The issued certificate will then show your organisation details in the certificate which may include your business name, city and country. It generally takes a few days for this type of certificate to be issued.
As with the standard certificate once installed your users browsing your website will see the green padlock to confirm that there connection to your website is on a secure HTTPS connection.

Extended Validation Certificates
The strictest level of certificate that you can obtain. The certificate authority will validate and check the ownership, organisation information, physical location, and legal existence of your company. Usually they will require documentation to verify the existence of your company by real human involvement. For this reason they are generally expensive and can take a few weeks to be issued.
Once issued your users are greeted with not only a green padlock but a green address bar with your company’s name in it. Also as per the organisation validated certificate your organisation details are also present within the certificate itself.
Securing Multiple Domains
If you have multiple domains i.e. sub domains to secure as part of your main domain then you will require a wildcard SSL certificate. This is different to the above single domain SSL certificates.
You can secure unlimited domains with such a wild card certificate as show in the image below:
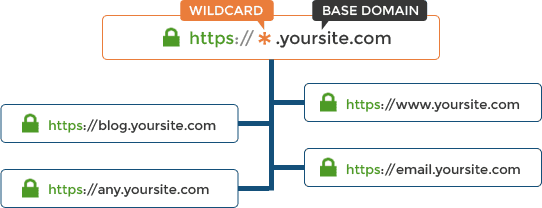
A disadvantage is that you cannot secure domains such as example.example.example.com. For this you will need an SAN Certificate which is also known as Unified SSL Certificates/Multi-Domain SSL.
You should decide before proceeding which is the most relevant SSLfor your website.
Chapter 3Where to get an SSL, what to look for and mistakes to avoid
In this chapter we are going to look at the options you have to acquire your new SSL certificate.
We will also look at the potential pitfalls and mistakes that you should avoid to make sure it doesn’t impact your website in a negative way.
Getting an SSL doesn’t have to be a difficult task, in fact if you follow the guide it should be pretty straightforward and easy to do.
So let’s dive right in…

Your Options to Obtain an SSL Certificate.
There are plenty of options to get your new SSL, in many cases it can be completely free! Let’s take a look at your options available to you…
Your Web Hosting Provider
Every hosting company gives you the ability to purchase an SSL. It may be as easy as going to your existing hosting provider to purchase your new SSL certificate.
 Are you enjoying reading this content? Support us by sharing it on Twitter
👉
Share on Twitter
👈
Are you enjoying reading this content? Support us by sharing it on Twitter
👉
Share on Twitter
👈
However many times the cost to purchase one is significantly higher than usual. After all they also have to make a profit, right? You could be looking at costs starting from £30 p/y.
If your using a reputable hosting provider they may also provide you with a free SSL certificate. Many web hosts have the Lets Encrypt service installed on there servers.
Way back in 2014 a group of security experts got together and created a new certificate authority called Lets Encrypt. They have the backing of big players like: Mozilla, Cisco, Akamai and many others.
The aim of the project is to provide every website with a secure SSL certificate for free and with complete transparency, security and cooperativeness.
The Lets Encrypt service works because no one company is in control. It is run by several initiatives with the aim of benefiting the community as a whole.
The benefits of the Let’s Encrypt service are:
- No requirement for a dedicated IP address.
- No costs associated. It’s totally Free.
- Its all automatic even down to the renewals.
- Recognized by all the major browsers.
- Easy to install and setup via your hosting control panel.
However it’s not all good news for Lets Encrypt. There are some disadvantages to the Lets Encrypt SSL service in comparison to other options out there:
- Doesn’t have a trusted root certificate.
- Domain Validated certificates only.
- Single Domain SSL’s only. Each separate subdomain needs another manual installation.
- No site seal to provide additional trust to users.
- 90 day validity for issued SSL’s
Another option that your web hosting provider may offer (if they have run on WHM/cPanel) are Free SSL’s via the cPanel AutoSSL option.

In 2016 cPanel the industry leading web hosting control panel provider announced that they would be rolling out the AutoSSL option to provide free SSL certificates via Comodo.
The AutoSSL feature is pretty straight forward. Its available with all the latest versions of cPanel from version 58.
There are no forms to fill out, no validation to complete and its all automated.
Its similar to the Lets Encrypt service but with a few key differences. Unlike Lets encrypt which doesn’t have a trusted root certificate the AutoSSL feature powered by Comodo does.
Comodo is a is a top SSL provider taking almost 35% of the market share according to a W3tech Survey. There SSL’s also come with 256-bit encryption and 2048-bit signature which is almost impossible for hackers to crack.
The benefits of the AutoSSL service by cPanel:
- Covers both the WWW and non-WWW version of the domain.
- Covers additional services i.e. webmail, cPanel, FTP.
- No requirement for a dedicated IP address.
- No costs associated. It’s totally Free.
- Its all automatic even down to the renewals.
- Recognized by all the major browsers.
AutoSSL certificates are easy to install and setup via your hosting control panel once your web host has activated the service from there WHM (web hosting manager) install.
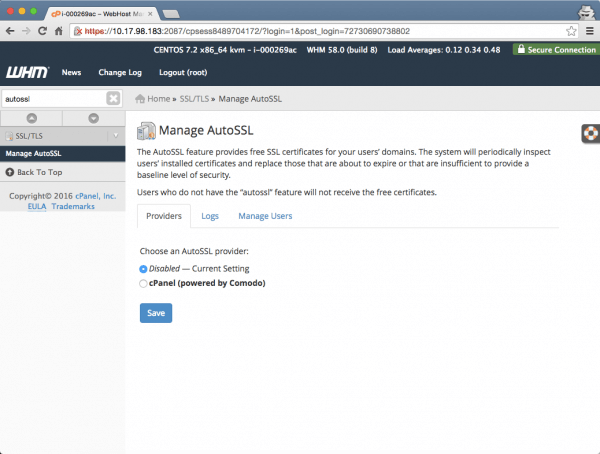
Once they have done that simply head over to your website and replace your HTTP URL with HTTPS and it will works instantly. Don’t forget to take the steps in chapter 4 to prevent any duplicate content issues!
Some disadvantages to AutoSSL:
- Domain validated certificates only and not EV or multi domain.
- 90 day validity for SSL’s.
Are you enjoying reading this content? Support us by sharing it on Twitter
👉
Share on Twitter
👈
Other options apart from your web hosting provider
Your hosting provider isn’t the only one or option to get an SSL. There are many reputable SSL providers that can provide you with a new SSL at a fraction of the cost. A good website to start hunting for your perfect SSL is SSLShopper.
They are a good reputable site giving you all the information required to make an informed choice. Providing you with reviews from other website owners and detailed SSL comparisons can make it easy for you to decide which SSL to get.
The SSL’s are split into different categories for you, so you can view all the popular cheap SSL’s or the more robust EV SSL certificates. Look at the reviews to make an informed choice. It can cost as little as £10 for your new SSL per year.
What to Look for and Mistakes to Avoid.
One of things to watch out for is who the actual SSL issuer is. This is the underlying certificate authority who will issue you with the certificate.
There has been a huge battle going on behind the scenes with Google and Symantec for a couple of years now.

In March 2017 Google (and Mozilla the developers of the FireFox browser) announced that it would no longer be trusting certain certificate authority providers.
The whole point of an SSL is to provide you with security when browsing online so that it can protect your data from hackers and the like.
Google found that Symantec, one of the largest certificate authorities and providers of SSL certificates in the industry, miss-issued certificates!
Symantec root certificates power popular SSL brands such as: Norton, Thawte, RapidSSL and many more. As of April 2018 your website and more importantly any SSL issued by the effected brands will no longer be considered secure in FireFox or Chrome browsers.
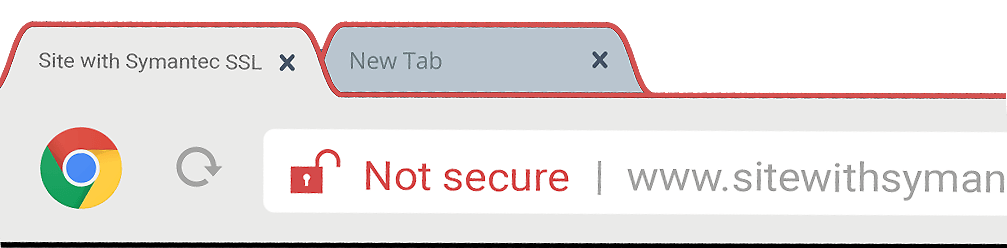
Find out more how this could affect you or which brands are affected in this post here (for whatever reason this post has been removed so here we updated the link to a web archive version.
OK, now what you have been waiting for. The easy steps you can take to implement an SSL and switch your website from HTTP to HTTPS.
A couple of caveats apply here.
We hope that you have made an informed choice of which SSL you are going to use and are ready to take the steps to proceed.
We are assuming that you already have web hosting and it’s on the cPanel platform. This will allow you to easily install the SSL certificate in a few steps. Many of the popular and decent hosting providers are using the industry standard cPanel platform that will allow you to manage all aspects of your web hosting from its admin interface.
If you are unable to install an SSL because you’re on shared hosting and it doesn’t give you that option then you should seriously consider moving providers.
We are also assuming that you have an existing responsive website and its running WordPress. Although the steps relate mainly to a WordPress install they can also be applied to a bog standard site (with a few small differences).
Chapter 49 Steps to Implement SSL on your Website
In this chapter we are going to go over the steps required to install your SSL and configure the settings on your website to switch to HTTPS.
Some of the steps will relate to installing your new SSL. These may not apply especially if your have a good web hosting package that comes with a free SSL. So skip those steps and go straight to step #4.
At the end of the steps you will migrated your site from HTTP to HTTPS and the search engines will start to re-index your new SSL URLs without having a negative impacting on your current organic traffic!
Lets jump right in and get you moved over to HTTPS.

Step# 1: Generate a SSL CSR Request
Firstly what we need to do is generate a CSR. This is a certificate signing request for your domain. Each domain needs to have a specific signature in order for you to obtain an SSL. That is unique to your domain and your domain alone.
TIP: If you have opted for an OV/EV validated SSL certificate OR are using a free SSL via the Lets Encrypt or AutoSSL via cPanel service you can skip this step and go straight to step #3.
So head over to your hosting control panel (cPanel hosting) and navigate to the security section.
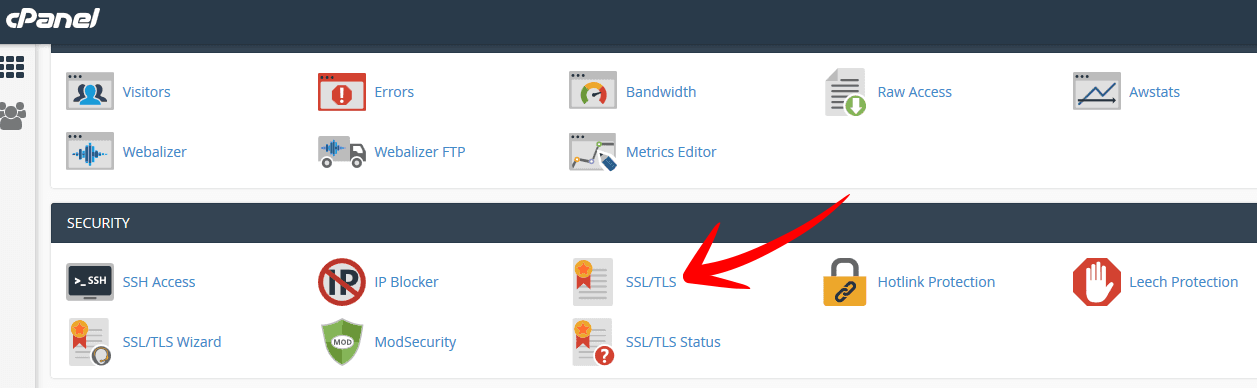
There you will see the option for SSL/TLS. Click on that to go to the next screen.
Once there you will have four options. You want the 2nd option which is to generate Certificate Signing Requests (CSR). Once you click on that link it will take you to the CSR section to generate a unique key. It will look similar to below.
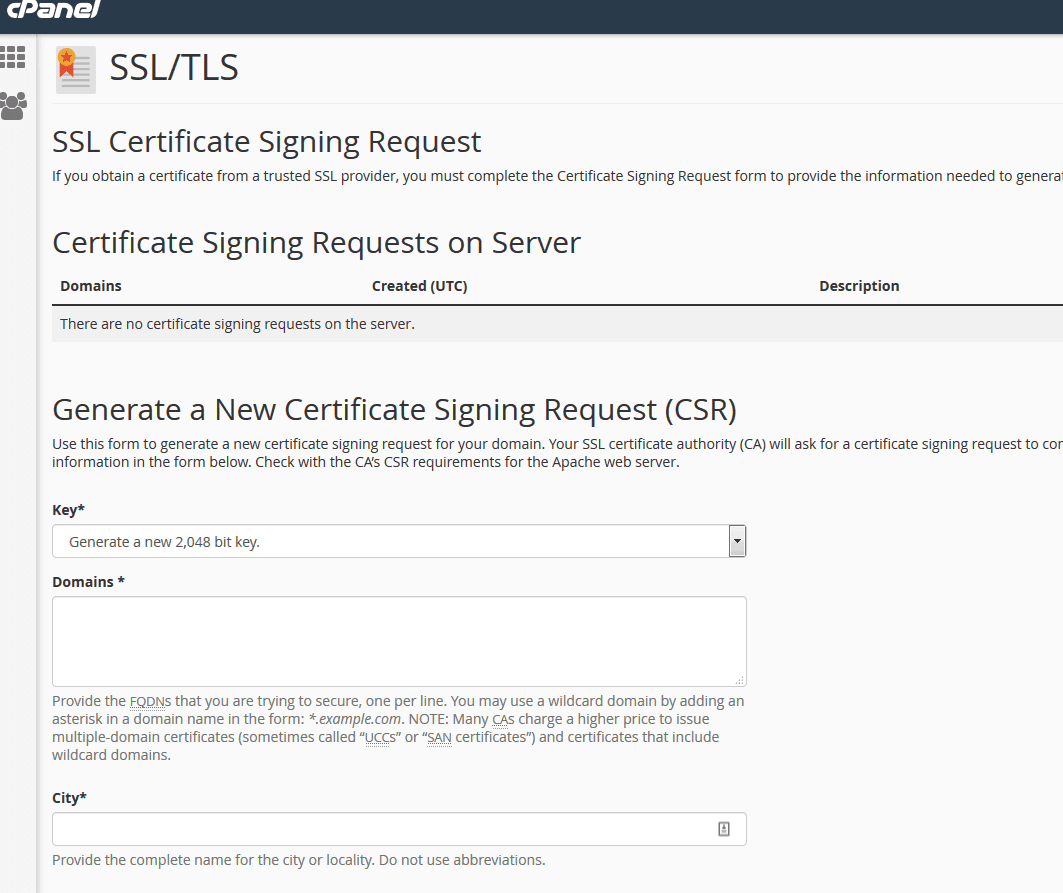
The most important part of this page is the domain section. Generally an SSL can secure both the WWW and non-WWW version of your domain. This is however dependant on the SSL provider you have chosen.
We generally add in the domain with WWW here. So it would be: www.example.co.uk and not the non-WWW version. That would be secured anyway. However IF you put in example.co.uk then the SSL would only secure the non-WWW version and not the WWW version as well.
After that, fill out all the other information as requested. Again depending on the type of SSL you have gone for (standard/EV) this information will be used within the certificate itself.
That’s it, simply click on the generate button and it will spit out a CSR which will look similar to this:
1 2 3 4 5 6 7 8 9 10 11 12 13 14 15 16 17 18 | ============================================================ Certificate Signing Request: /home/ /ssl/csrs/www_example_co_uk_9e3d1_1581b_5bfee6d2be6324cbf8c8ac52a059de76.csr ============================================================ -----BEGIN CERTIFICATE REQUEST----- MIIDFzCCAf8CAQAwgbYxEzARBgNVBAgMCkxhbmNhc2hpcmUxCzAJBgNVBAYTAkdC MSYwJAYJKoZIhvcNAQkBFhdhZG1pbkBhbG9lLWhlcmJhbC5jby51azEeMBwGA1UE +BekOyV1jwvNVPMEYJwI9Noj3Xl8VzfXkCGuOBu3Do94+EAs6NtAyzwlMDLRRBQfBucZx1wj SJT2JewEHhJ18daw8mqM6+N/auWApGlOIgDoH4PxGBrxscBjQmf8uzP2qOIMedpn IKJxWBsCAwEAAaAbMBkGCSqGSIb3DQEJBzEMDApiYXJvbm5hbG9lMA0GCSqGSIb3 DQEBCwUAA4IBAQCdKwftLUrnFcDZh6VOIfmbxAg8hU8NSx8RQQANcTmsQDgVnTxx wGqKF8cKK4a2RqK8HQhFXE5x694XxSvWJSYoOglpUThhMP2x47M3bEA10RWOMLvh sUK/vUqq5PUcrddSM4zdYaT8N6FkB4krqgMeDbDGQd5fFwO43YcvHWAq2mCItQs/ C0VRkyd2+9JGeFQVBiCSrZzLv7f6UBzuOnIGa/YDr/d7ut1NtC66E6CiHPUL/oYq WJedO6ove+/l6h5eXQ9BnUGaDrXtnzrtruaI6x6fEv3Q6C+m6EP8Ty8flOzqjwRK MjPqUqr1Ab1vmjFclwvtsvhZJfC/scBUw6iT -----END CERTIFICATE REQUEST----- ============================================================ |
Copy your CSR code and keep this to hand. It will be saved on the server for your to use in step #3 buts it’s better to keep it to hand just in case you need it. Open it in a notepad or Notepad++ file ready to use should you need to.
Step #2: Buy your OV/EV Validated SSL
The next step will be to use that code that you generated above and add it to the section requested when you are purchasing your SSL. Every SSL supplier will have a different setup to allow you to generate an SSL however the process should be the same.
Without the code you generated above you will not be able to proceed, so make sure you have generated the correct signature and followed step 1 properly.
Step #3: Installing an SSL
Once you have purchased your SSL depending on which one you have chosen you will receive an email with your certificate. The bundle you will receive will contain a few certificates. One will be your actual certificate and the other will be the certificate authority. As we discussed above, a standard one could potentially be issued in a matter of minutes to an EV certificate which could take a couple of weeks.
Open the email your received from your certificate issuer. It will contain a text copy of the certificate in the email, so copy that ready to use. If your issuer didn’t include the text file in your email then in your certificate bundle open up the zip file and locate your domain certificate which will usually be named after your domain i.e. valendigital_co_uk.
Right click and open that up in notepad or our preferred tool notepad++. When you do, you will have code that looks similar to step 1 you took.
Now you are ready to install your SSL. Simply head over to your hosting account and navigate to the Security > SSL/TLS section. This time you will be clicking on the last link which is: Install and Manage SSL for your site (HTTPS) and you will then see the install SSL page as shown below:
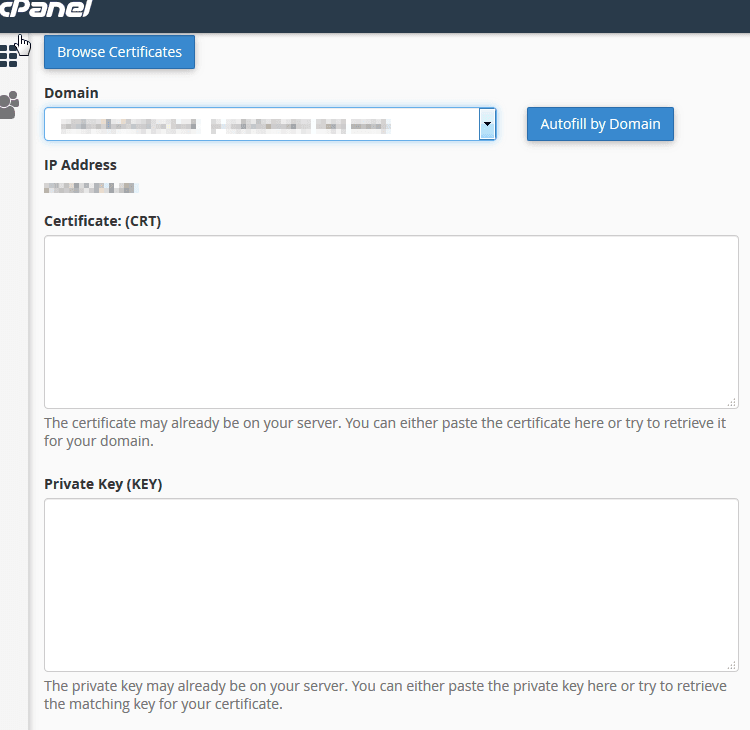
You don’t need to click on the auto fill by domain boxes first as sometimes this can be more confusing to follow.
Simply copy the certificate you have received from your SSL provider which you should have in your email OR open it in your notepad file and the copy and paste it into the first box (Certificate: (CRT) box). If you have done everything correctly this will auto populate all the required boxes from the information within the certificate. You can then click the autofill button and this will populate everything. Then click install. That’s it, nice and simple. Your SSL is now installed and ready for you to use!
Installing Lets Encrypt SSL’s
Implementing an SSL from the Lets Encrypt service is much easier than the steps above. You wont need to generate any CSR’s or buy an SSL (unless you plan on using an OV/EV validated SSL) your simply going to choose your domain and click install. It’s very simple and easy to do.
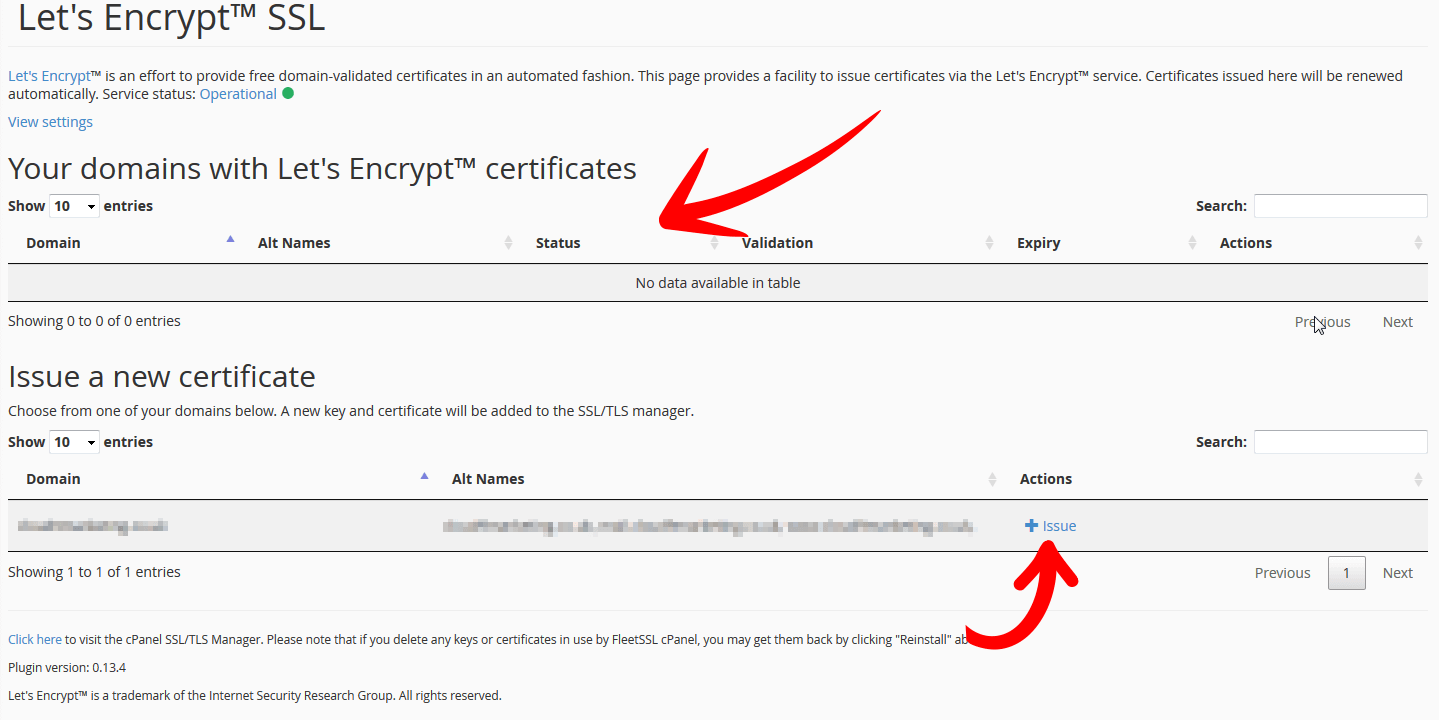
Go to your cPanel account and navigate to Security and then click on the Lets Encrypt logo:

On the following screen you will see domains that have already been issued with an SSL in the top section and the domains that you have available with a ‘+ Issue’ next top them in the bottom section. Select ‘+ Issue’ for the domain you wish to add the SSL for.
The following screen will allow you to choose the variants for your selected domain. Its recommended to also choose the service sub domains (as per the arrow in image below) so that all the domain and its related services are secured.
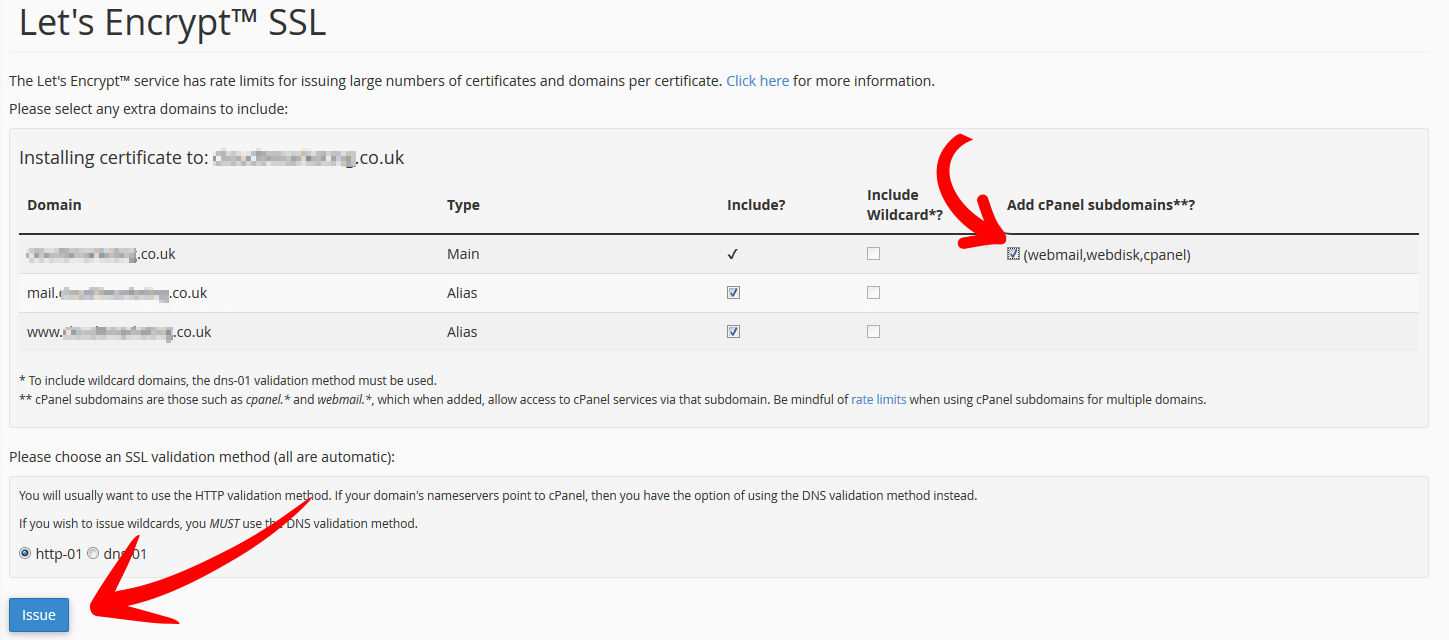
Then simply click issue. That’s it. Your website will now be issued with an SSL which you can use straight away.
cPanel AutoSSL Install
Installing an SSL via the cPanel AutoSSL service is even simpler. You actually don’t have to take any steps at all. So long as your web hosting provider has activated it on the server then the SSL will be available immediately. If that’s the case you can proceed to step #4.
If you manage your own VPS or dedicated server, then so long as your system is up to date with the latest cPanel/WHM version you can activate AutoSSL via your WHM GUI.
Login to WHM and navigate to: Manage AutoSSL or type it in the right hand search box. Then select the option once its shown.
You now have a couple of options available. If this is the first time that you are using this service then you will need to change the setting from ‘disabled‘ to ‘cPanel (powered by Comodo)‘ option under the providers tab and then hit save.
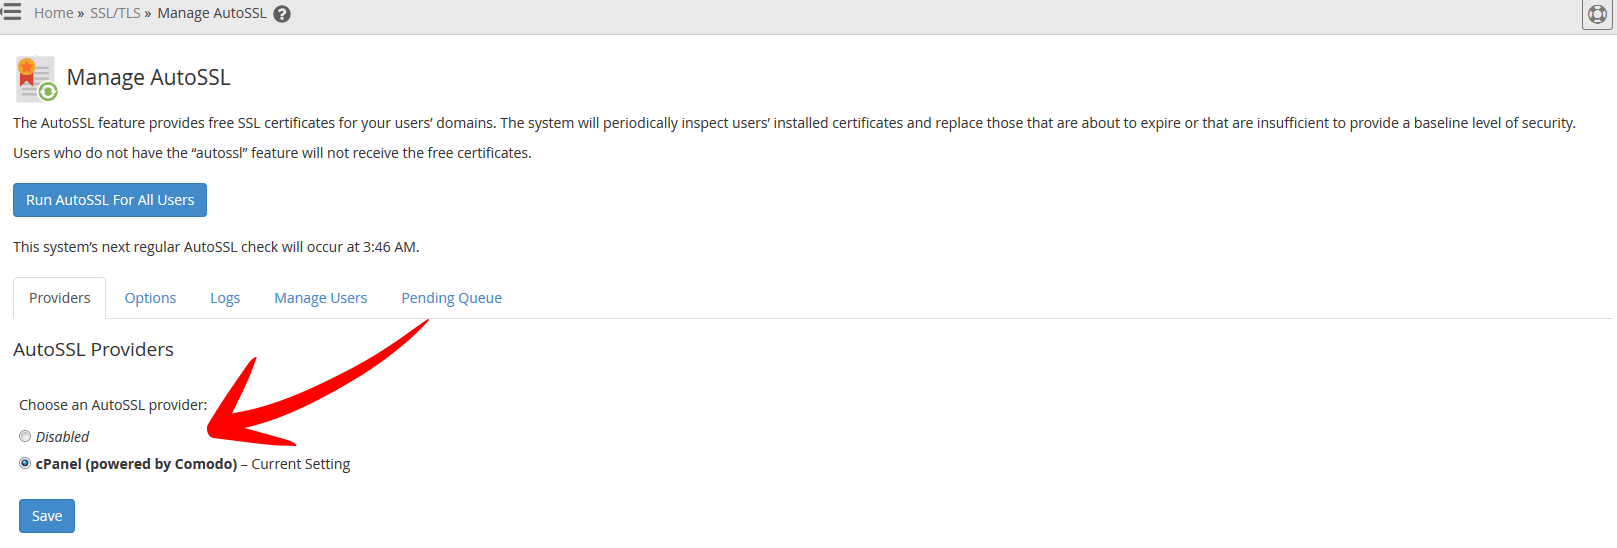
Before you go ahead and click the Run AutoSSL for ALL users button its best to configure some additional options. These will allow WHM/cPanel to automatically renew and send emails etc. for when your SSL certificates are expiring or for any issues that may arise. Select the options tab and configure your settings as desired.
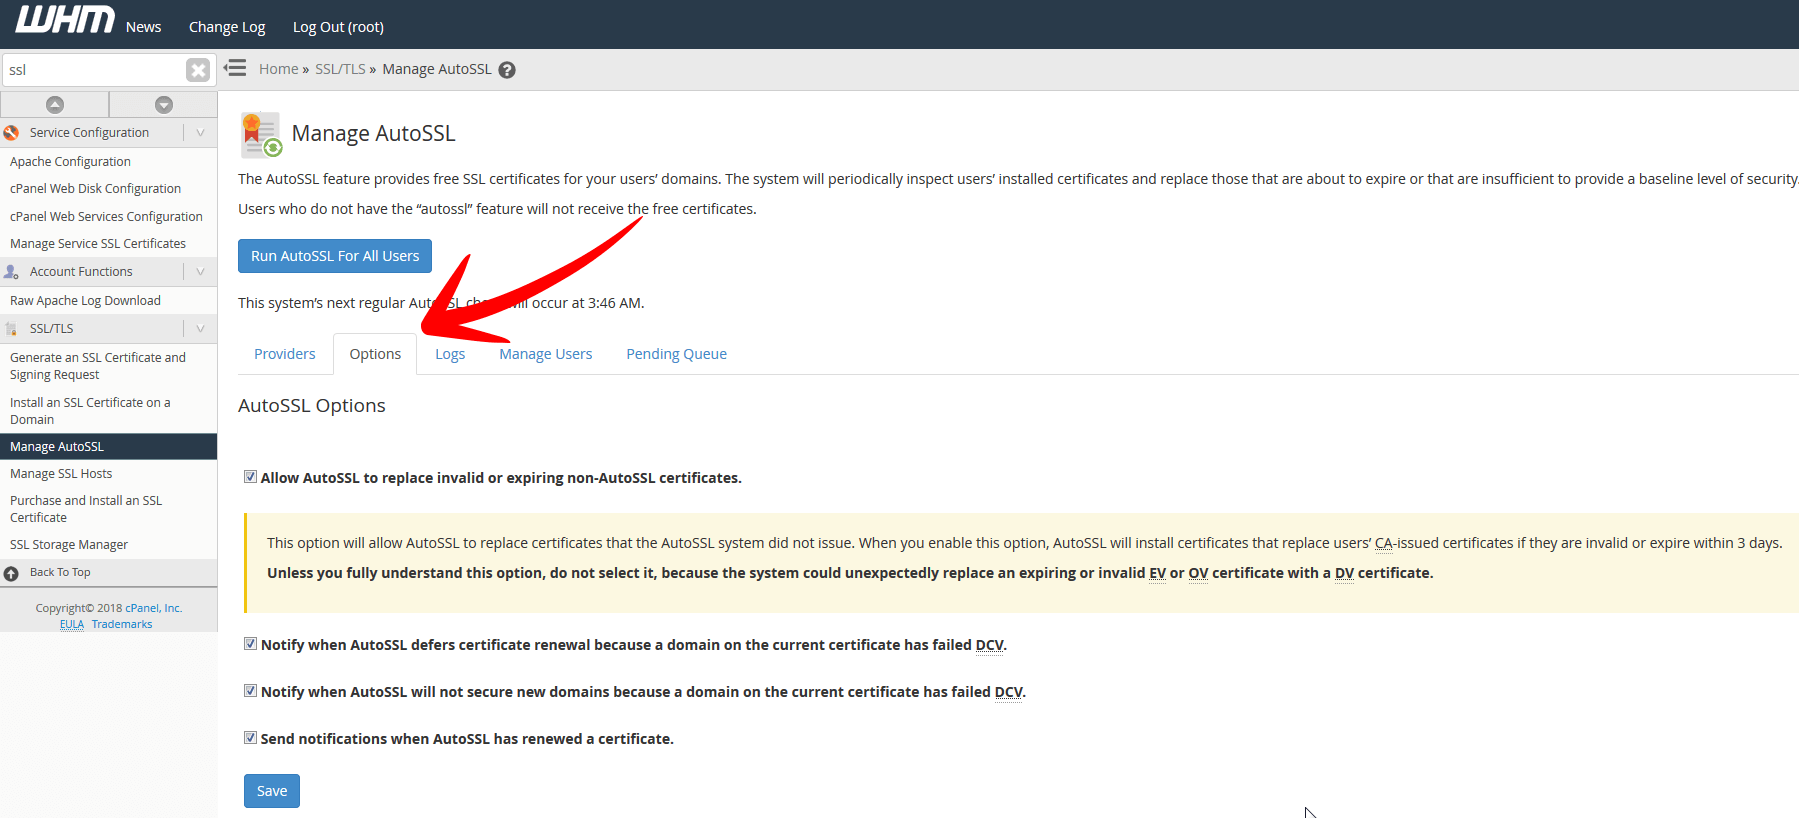
Once you have selected all the required options click on the button ‘run AutoSSL for ALL Users’. That will begin the process to install SSL certificates for all domains that are hosted on the server. Fairly easy and straightforward.
The manage users tab will allow you to override any AutoSSL settings for domains that you do not wish to be used. This may be the case when you migrate to an OV/EV validated SSL and as such having AutoSSL enabled can in some cases override your OV/EV validated SSL install with an AutoSSL powered domain validated certificate instead. Its best to disable AutoSSL for these domains before hand.
Step #4: Migrate HTTP to HTTPS WordPress URL Settings
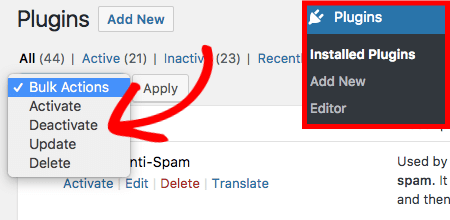
Login in to your WordPress admin section. Firstly turn off any cache plugins that you may have enabled. That will save you seeing any errors upon completing the next couple of steps.
Then navigate to your general settings. There you will have to 2 settings. One is the WordPress URL and the other is site URL:

Change those URL’s protocols from HTTP to HTTPS and click save. This will most likely log you out of the admin section and back to the login page. Log back in and navigate back to the Settings > General page. Confirm that the settings have indeed changed.
You can also see if the settings have been updated via the browser address bar which should now have a green padlock in it.
New Update 2021: Latest WordPress 5.7 version release helps with HTTPS moves 😎
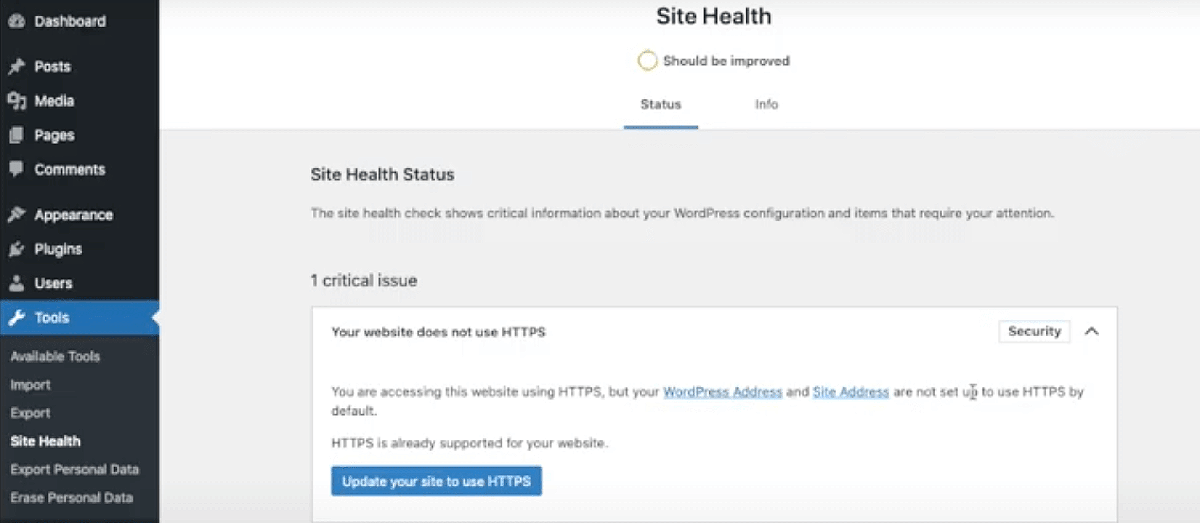
The latest WordPress 5.7 version release comes with a welcomed 1-click HTTP to HTTPS tool. It has always been a pain when migrating WordPress HTTP to HTTPS and thankfully with the new version you can alter all URL references in the database from HTTP to HTTP at the click of a button.
The painstaking task of manually updating URLs to ensure you don’t get the dreaded mixed content message should now be a thing of the past. Switching, as WordPress has put it, has never been more easier.
This new WordPress HTTPS migration feature which is located in the Tools > Site Health section. WordPress will detect if your site supports HTTPS and if its not using HTTPS then a health message will appear for you to be able to update your whole site to use HTTPS in 1-click.
Step #5: Update HTTP to HTTPS .htaccess File Code with 301 Redirect
Now although your site may have an SSL installed and you have configured WordPress to use HTTPS for your URLs the old HTTP URLs are still available! We want to quickly address this.
Using a few lines of code we are going to: 301 redirect all the HTTP URL’s to their respective HTTPS versions.
So go to your hosting control panel again. Navigate to the file manager which is in the files section of cPanel. This will bring up all the files for your website. Under public_html (or where ever you have your WordPress site installed) look for a .htaccess file.
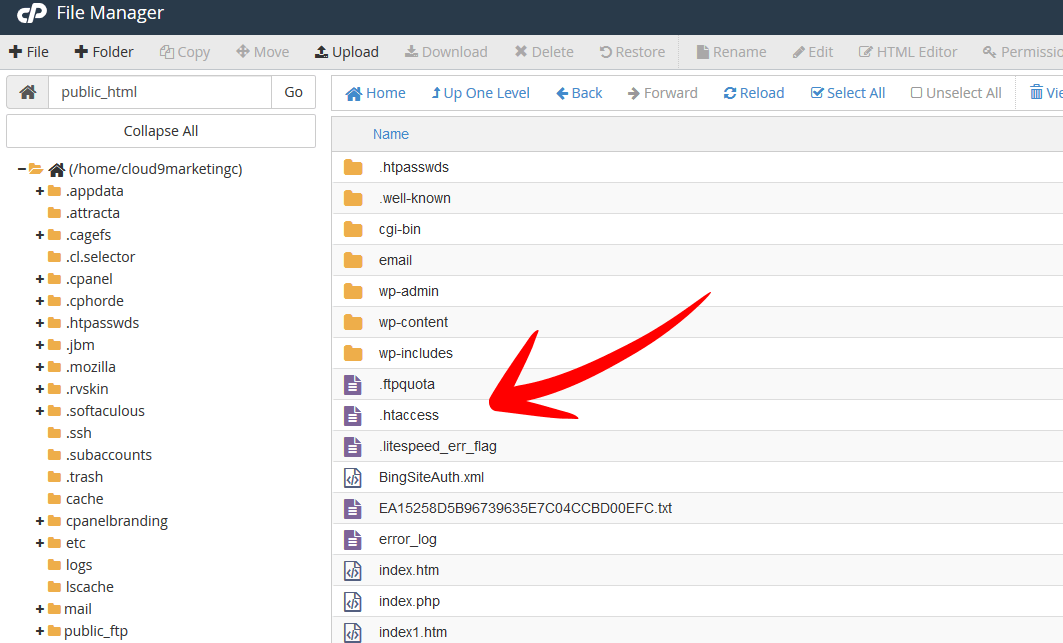
Sometimes these types of files are hidden. To view those files if you can’t see them, click on the settings link in the top right hand corner on the file manager screen. A popup box appears where you will have the option to show hidden files. Click the check-box and hit save. This will refresh your file manager screen and you should now see those hidden files.

OK, open up your .htaccess file (right click > Edit)
In this file you are looking for this line: # BEGIN WordPress
Above this line you want to add in the following code:
1 2 3 | RewriteEngine On RewriteCond %{HTTPS} off RewriteRule ^(.*)$ https://www.example.co.uk/$1/ [L,R=301] |
TIP: make sure you replace example.co.uk with your own domain. Also take out WWW if you’re using the non-WWW of your website.
Basically what this code says is that if a URL is browsed on your site that’s HTTP (HTTPS off) then go to the HTTPS version. It’s a very simple piece of code that will 301 redirect the HTTP URL’s to the HTTPS version without multiple redirect chains. It’s nice and simple and just works!
Confirm your 301 Redirect from HTTP to HTTPS
Now that you have your 301 redirect in place we want to make sure that its actually working as expected. You can check this via a free online tool called Redirect Checker.
Pop in your old HTTP URL into the box and hit analyse. If all is good then you will see a success message. That means the HTTP URL was successfully redirected to your HTTPS version.
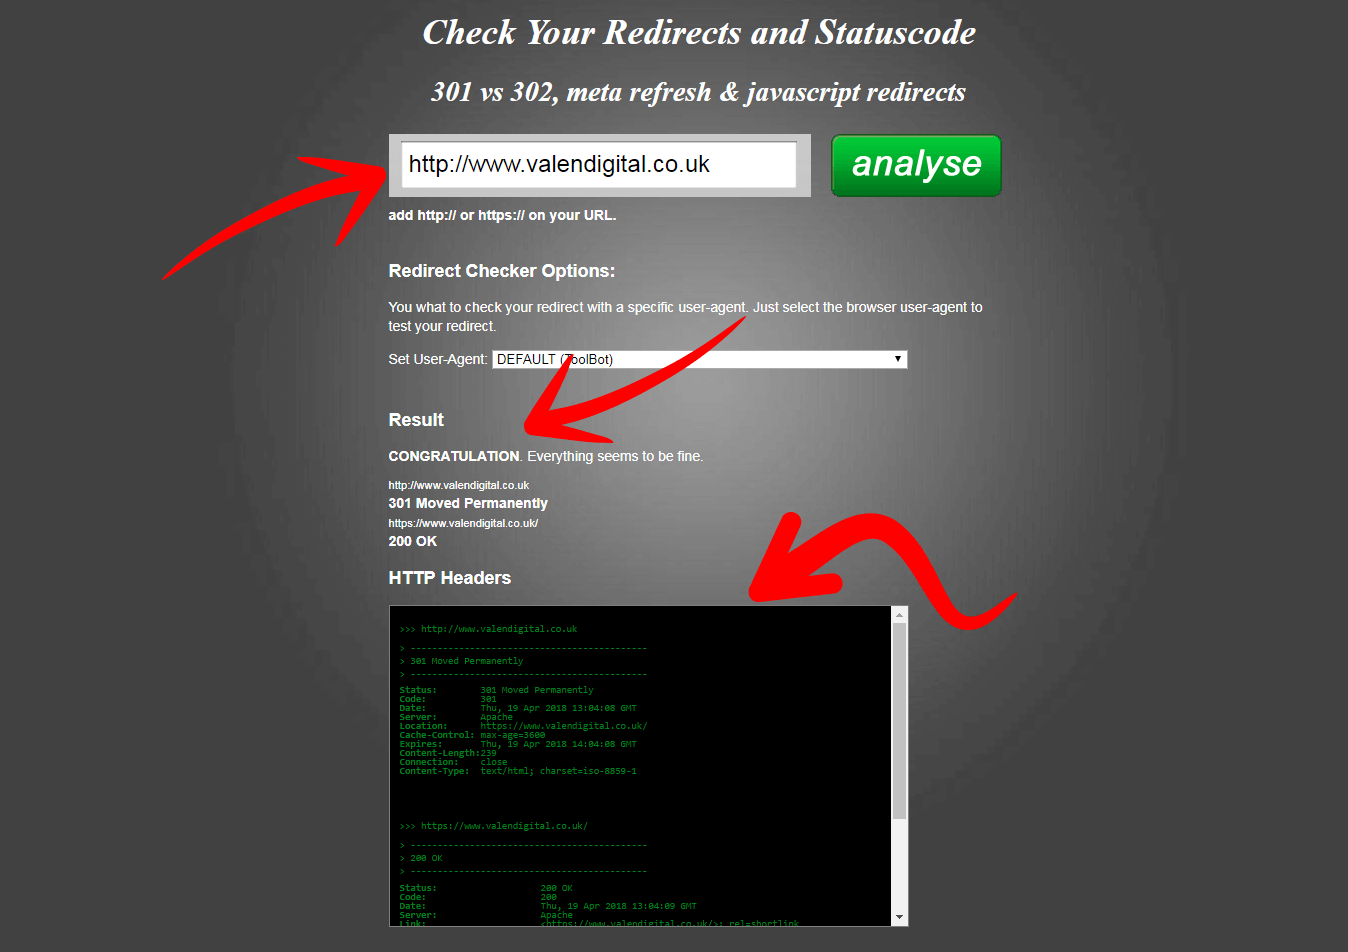
It will even show you your header response codes direct from your website which will contain some additional information and it further confirms your 301 is in place and working.
You can also check other HTTP URLs for your website and the result should be similar to the previous check: 200 response code given.
Step #6: Check for Insecure Content Errors
Now you should be using a good theme and if you are then you shouldn’t have any error messages on the front-end of you site.
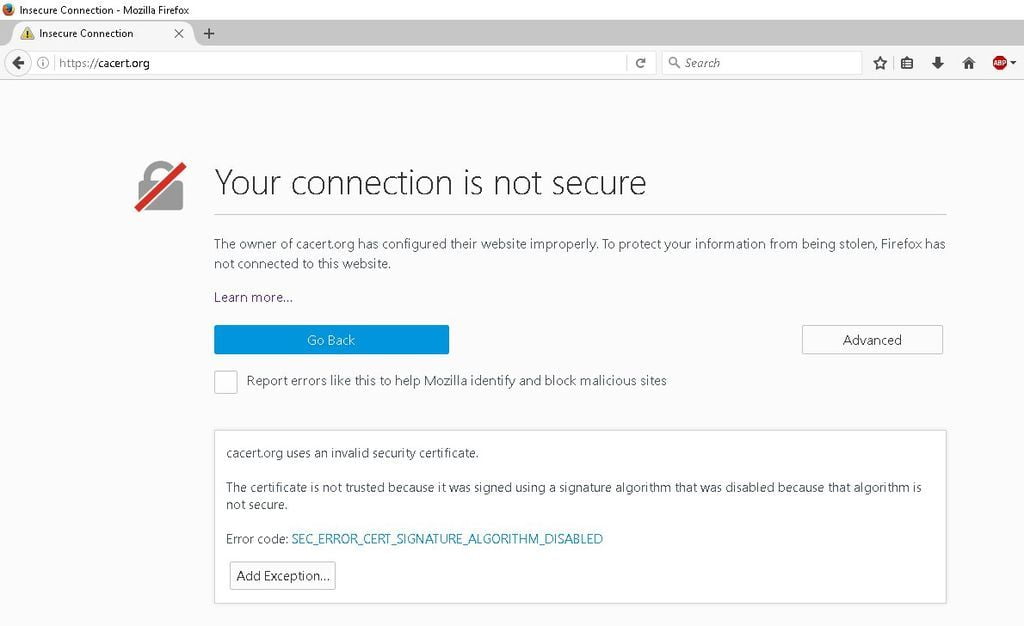
If you get insecure content messages or the browser padlock isn’t green but crossed out this means that there are files being called by your site via HTTP and its usually image/CSS/JS files that are the culprits.
Identify HTTP culprits using Screaming Frog
Screaming Frog is a nifty little tool that will crawl your website (its one of our goto tools when we conduct technical SEO audits)and give you all the nitty gritty information that you need.
Its free to use for 500 URLs after which you will need a paid subscription to crawl more URL’s.
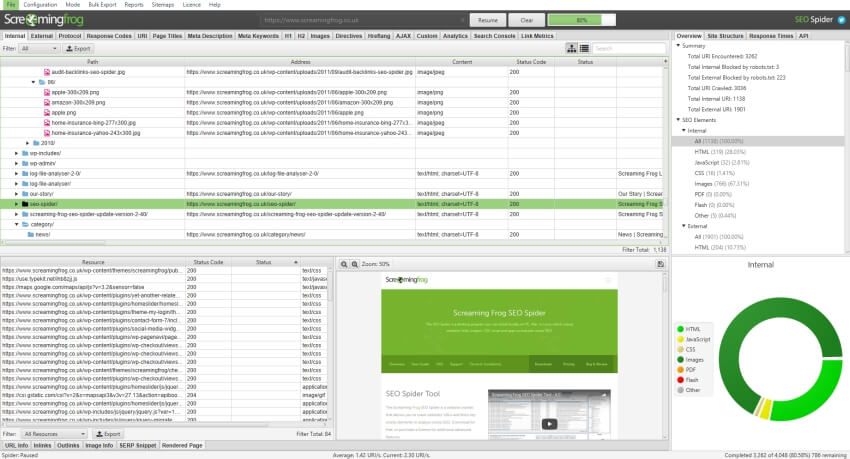
Pop in your HTTP only URL into Screaming Frog, we are looking for the response codes given for the HTTP URL and they should all be coming back as 301 (redirected to HTTPS). We can also look at the protocol URLs that are being given by the site. Your on the look out for HTTP protocols and those are the ones you want to fix. This nifty slide shows you how that can be done.
Using your browser to find HTTP files
To find out which files may be causing the issue simply visit the website in the FireFox browser (if you get the insecure message click advanced and accept for now). Once the site has loaded click on the ‘i’ icon next to the padlock in the address bar. This brings up a popup to show the connection details. Click on the arrow in that box and then more information link at the bottom of the next box.
The following pop up box opens up by default on the security tab. You want to select the 2nd option tab which is media files.
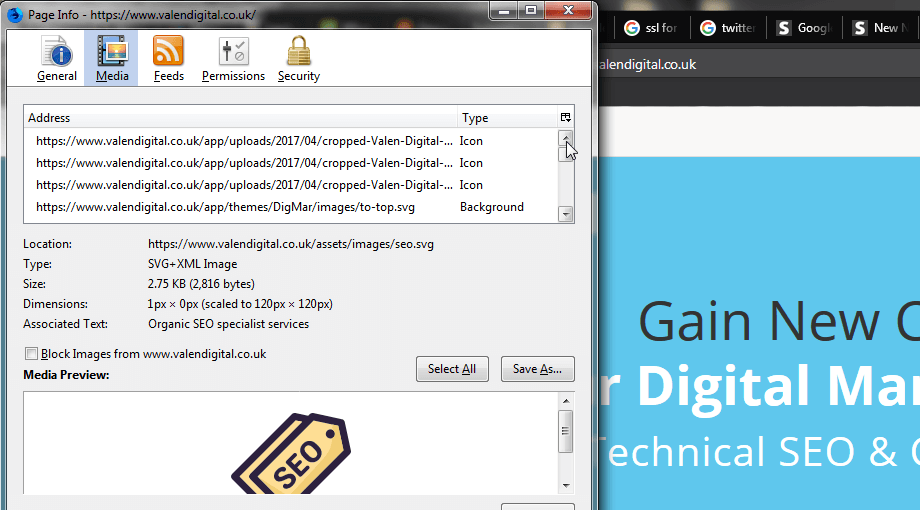
This will show you all the media files on your site. If you click on the address label you can toggle between the results.
What you’re looking for is images that have the HTTP protocol. These are most likely inserted into your website page manually. So you will need to go to the page/post in WordPress and look for that image.
Once you have found it simply change the HTTP to HTTPS, or as we like to do, strip the HTTP/HTTPS altogether. Browsers are clever enough to apply the HTTP/HTTPS protocol depending on if you do or don’t use an SSL. This saves us a huge headache when we are developing websites locally!
For other types of content i.e. CSS/JS files these are more difficult to find. You could view the page source (CTRL + U in FireFox) and CTRL F to bring up the find box. Type in HTTP:// and it will show you all the elements called using that protocol.
Once you have identified those you need to address them. Typically they exist in the header or footer php files of your theme.
Use an online tool to find insecure content
If you don’t want the kafuffle or its overwhelming for you to do this, then you can use this service which will find those files for you.
Fixing insecure content and HTTP resources
Again navigate to your WordPress admin section and from the menu select Appearance > Editor select the header.php file from the right hand side (ensure you are selecting the one from your current theme) this will then bring up that file in the editor. Then it’s a simple case of looking for any CSS/JS files that have the HTTP protocol and to replace them with HTTPS.
TIP: rather than replacing the HTTP with HTTPS simply remove HTTP: (leave the //) as stated above the browsers can decide the protocol to use themselves.
Follow the same step for the footer.php file and don’t forget to hit save for both files.
That should be it.
HTTP to HTTPS Migration Checklist
On some occasions it’s not that simple. A poorly coded theme could have CSS/JS file calls within multiple files or the page builder you use with your theme like visual composer hard codes the links.
Our recommendation would be to get either your developer or theme publisher to resolve this. You don’t want to break your site completely!
Failing that we can help you, get in touch with us today.
Step #7: Configure Google Search Console
Head over to Google Search Console (formally known as Google Webmaster Tools) there are a couple of settings that you should already have in place.

If you’re using the WWW version of your site Google should be aware of this. If you haven’t already done this you will have to add both variations of your site into search console and verify them. So add in www.example.com and example.com. Verify them with one of the options that Google search console gives you.
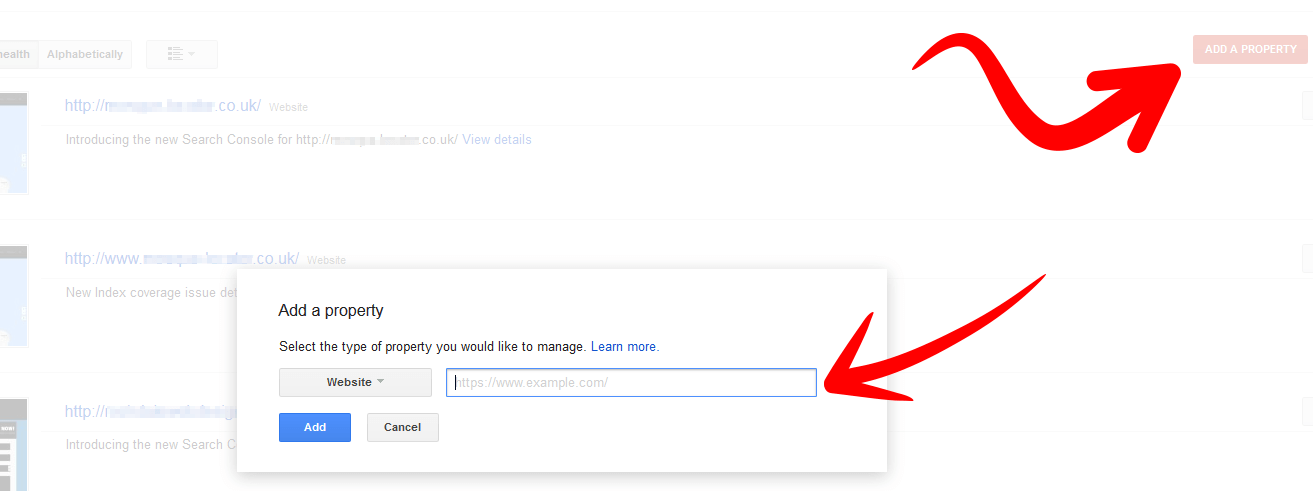
Verify your domain version on Search Console.
After you’re verified you can then select which is your preferred domain. With WWW or without. That setting is in the top right hand corner. Click on the cog icon that will bring up the menu and select site settings. That screen will then allow you to choose your preferred option.

Once that’s done simply add in your new HTTPS URL via the add a new site screen on the home page of search console.
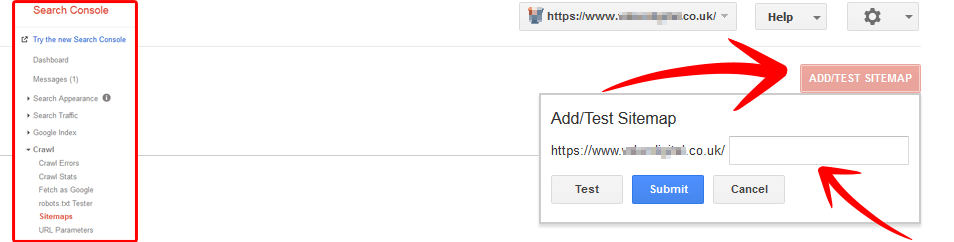
Submit you HTTPS sitemap to Search Console.
Next we want to submit your new sitemap to your newly created HTTPS website variant. That will ensure that Google starts to crawl those new URLs.
Use Fetch as Google to quickly request indexing
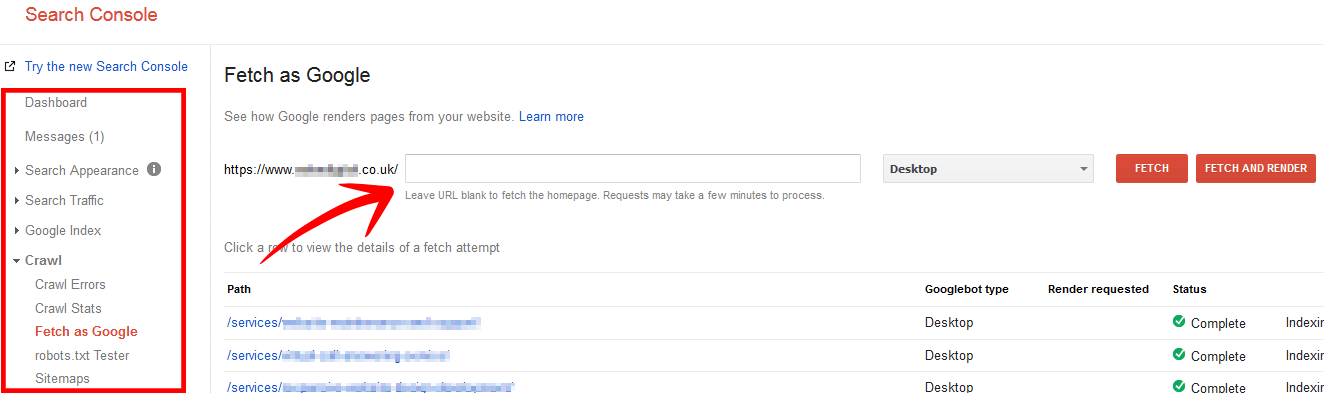
Then head over to Crawl > Fetch as Google for your new SSL property. This will immediately get GoogleBot to crawl your site. Once GoogleBot has crawled your URL you can request it to index just the main URL or the main URL and all direct links. Its recommended to request all direct links also. This should speed up the indexing of your site for Google.
You can’t set HTTPS as your default preferred domain however if you followed all the steps above Google will pick up the 301 redirects to your HTTPS version and start to show metrics.
Google Disavow file update
The last step you need to take in search console, if it applies, is if you have a disavow file. This file now needs to be duplicated for your new domain you added in. Simply download it and re-upload (checking to make sure it’s still relevant) to your newly added domain. Be very careful here. Any errors can mean your site disappearing from the Google search engine altogether!
Finally if you are using Bing (which you should be and if you’re not, why not?) duplicate that same process there. It’s more or less the same procedure for Bing. So head over there and complete that whole process again.
Step #8: Update Google Analytics
The final step is to make sure that Google Analytics has your correct URL. You are using Google analytics right?
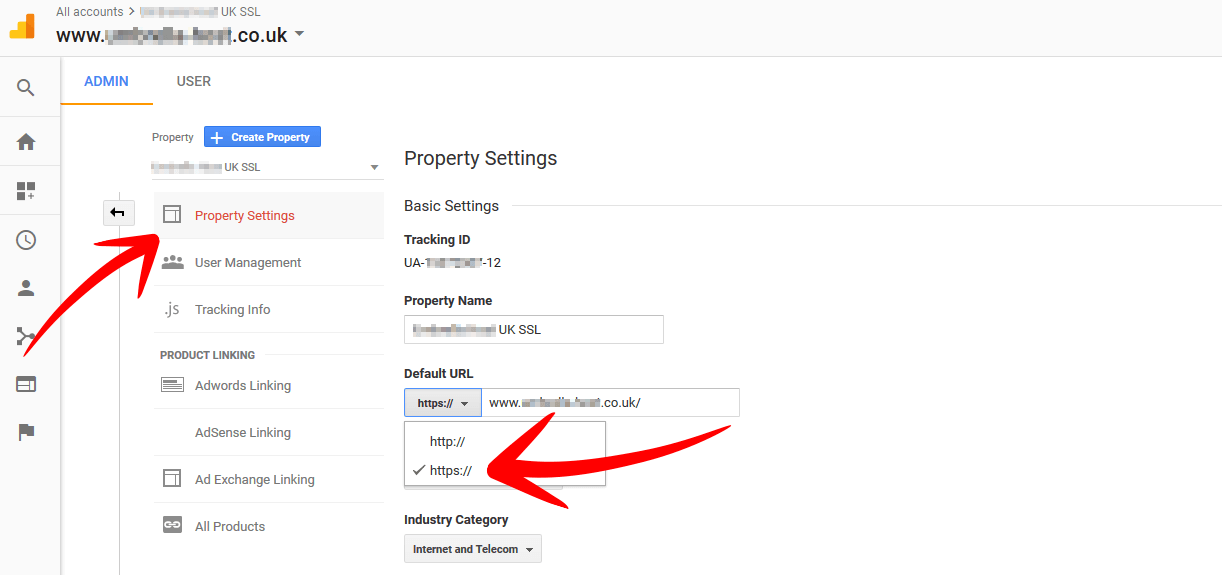
Head over to analytics and go to your admin section. Under your property (middle section) select the correct property (website) from the drop down and then click on the property section. There you will see an option for default URL. Simply toggle between HTTP to HTTPS.
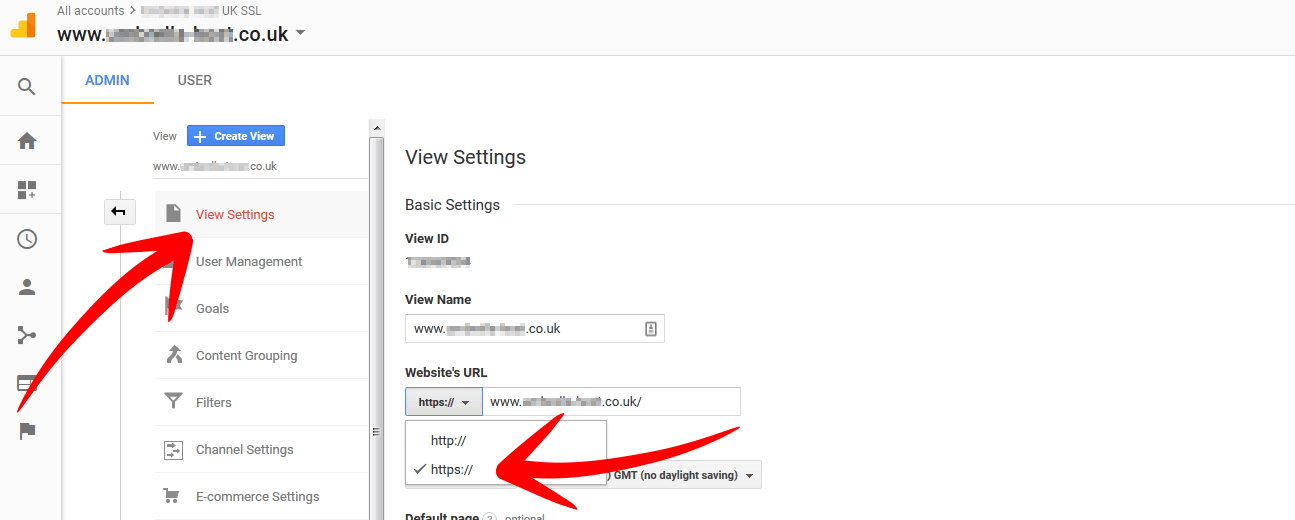
Next go to the view section (last box) and make sure you have selected the correct view (you can also apply this to all views if required). If your Google Analytics is all setup properly you will have a minimum of 2 views.
One view which has ALL your raw data unfiltered and untouched and another which has filtered data according to any filters and settings you may have applied. Click on the view settings link. Again as before simply toggle between HTTP to HTTPS and hit save.
That’s it, you’re all done. Everything should be purring like a sweet kitten now :)
Step #9: The results of implementing SSL
Great you’ve made it this far. It was a bit of a long read and complicated in some steps that you needed to take. But give yourself a pat on the back as your website has now been migrated to HTTPS.
Your site should show a nice green padlock.
And if you went one step further and got the EV SSL certificate well your business details will be show in the browsers address bar.
Combining that with the code you implemented in step 5 all your URLs should be intact, no impact on your organic traffic from the switch and the search engines should be able to index and crawl your new URLs properly.
Chapter 5Advanced SSL Implementation tips
Now that you have migrated your website from HTTP to HTTPS there are a number of advance steps that you can take.
These advanced steps will further enhance your SSL implementation, making your website load faster and more secure to prevent potential hackers eavesdropping on your secure connection!
The advanced steps require a certain amount of access to your web server in order to configure and apply them. Many of the advanced tweaks can be done with only access to your website files, other will require direct server access.

Advanced Step #1: Apply http/2 protocol
At the time of writing (December 2017) many sites still use the HTTP/1 protocol on their website. It works but it’s a very old protocol from the early days of the internet. It doesn’t have any security issues or anything like that. This step is more related to the speed aspect of implementing SSL.
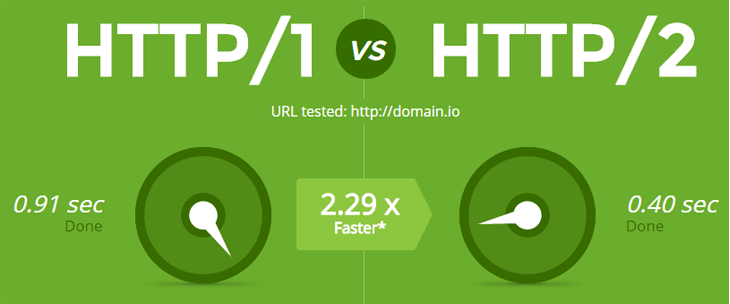
Back in the days when we had very slow internet speeds having a site on SSL would make your website load slightly slower than if it was on bog standard HTTP. It did that additional round trip to navigate via the SSL route. That in today’s age is negligible with the advent of fibre broadband etc.
However moving to HTTP/2 can give you an ever so slight speed increase. Given that the whole purpose of implementing SSL is to appease the Google search engine (and others) which is indirectly associated with the page speed of a site it does make sense to tick all the boxes. Doesn’t it?
Core Benefits of HTTP/2 Implementation
The main benefits of applying HTTP/2 to your website setup can be summed up as follows:
- Parallel multiplexed requests & responses which don’t block each other.
- Single TCP connection to transmitting multiple data streams.
- HPACK and HTTP Header compression.
- Server push to send additional cacheable information.
- Faster website performance, reduced latency.
- Better search engine rankings!
- For mobile, provides lower latency, battery usage and bandwidth usage.
Rather than recreating the wheel, there is a comprehensive guide to HTTP/2 that covers all the key aspects to HTTP/2 and its benefits. Well worth a read.
Enabling HTTP/2 for your Website
To be able to use HTTP/2 you will need access to your server. There a couple of ways which you can enable it.
Going through the EasyApache process (EA4) will allow you to configure the modules required to run HTTP/2 for your site (and will apply to any other sites hosted on the server). Generally HTTP/2 will work with any version of PHP that you have installed. However at times we have had the issue of EA4 (EasyApache 4) warning that it will only install if you have PHP7 enabled for use on all the websites.
This in itself is not ideal. So many websites still have not migrated from older versions of PHP which are now outdated, unsupported and riddled with security vulnerabilities.
Alternative Options for Enabling HTTP/2
If you fall into this bracket then your options are fairly limited. You can either use PHP7 system wide (which is what would be recommended as it provides additional speed and security benefits) or install additional software like LiteSpeed.
Using LiteSpeed web Server for HTTP/2 connections

LiteSpeed is a web server that sits on top of and replaces your default Apache web server. It comes with HTTP/2 (one of the first to support this since 2015) and is significantly less resource hungry than Apache. Out of the box it provides better security, performance and compatibility for any website. It will also allow you to run whichever PHP version you desire in tandem with HTTP/2!
If you don’t have access to your server and are on a bog standard web hosting package then these steps will need to be taken by your hosting provider. All good hosting companies generally either have PHP7, HTTP/2 enabled by default and/or LiteSpeed installed.
If you are one of those unlucky website owners who is hosting there site with a web host that doesn’t have HTTP/2, PHP7 or LiteSpeed then its highly recommended to move now. For the same cost you are probably paying now (£5+ p/m) you can find a very decent host that will tick all the boxes.
Using A CDN for HTTP/2 connections
You last option would be to use a CDN provider. Many if not all provide HTTP/2 out of the box. The big providers like CloudFlare, MaxCDN and KeyCDN to name a few have HTTP/2 enabled as well as other security measure like DDoS protection as default. It also gives you a slight SEO boost as content is delivered to a server closest to the browsing visitor.

If you have a WordPress based website then this is quick and easy to configure (probably one of the easiest ways). It will work in tandem with your cache plugin (you are using one right?) Most popular ones like W3 Total Cache, WPRocket and WordPress Cache have a dedicated section within their plugin for you to integrate with a CDN host.
In this example we will be using W3 Total Cache with CloudFlare

If you haven’t already got a CloudFlare account then head over to Cloudflare.com and click ‘Sign up now!’. A free account will be more than adequate for your needs.
Create an account with CloudFlare, once you have done this you will be taken to the dashboard screen:
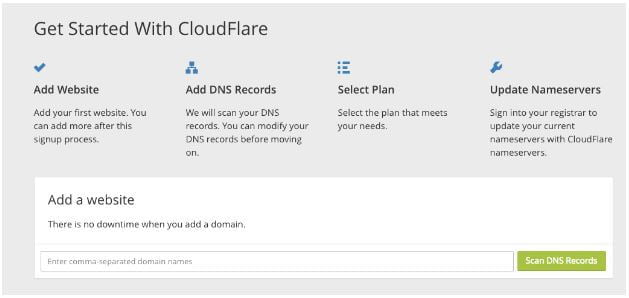
Follow the instructions to get setup. This will simply be to add in your domain name, click ‘scan’ to scan your DNS records and then select a plan (use the FREE plan, this is more than enough). Once that’s done you will be shown your new CloudFlare nameservers.
Head over to your domain registrar and add in the nameservers that CloudFlare provided to you. These are very fast and making this change will not result in any down time for your website :)
That’s about it. Your now using CloudFlare for your website. Keep your CloudFlare account open for the time being as you will need some details from it to use with your cache plugin (W3 Total Cache).
Head over to your WordPress admin section. Under Performance click on > CDN. You should see the options for CloudFlare there. If you don’t then head over to Performance > Extensions and activate the CloudFlare extension. Once that’s done you will see this screen:
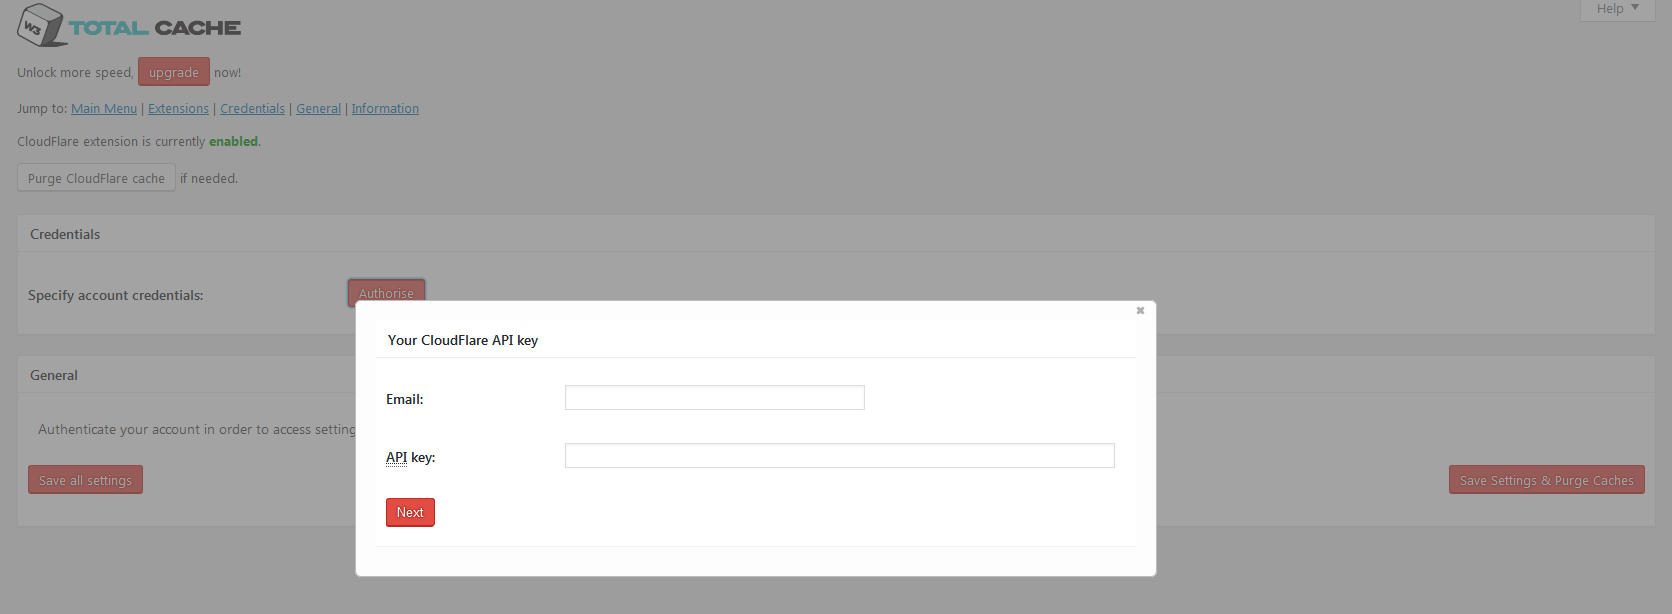
Add in your registered email and CloudFlare API key which can be obtained from your CloudFlare account and hit save. That’s it! Your all good to go. Your website is now setup to use the CDN and it will have HTTP/2 connections.
Common benefits of using a CDN are:
- Use of HTTP/2 for your connections and DDoS Protection.
- Improved load speed as visitors access your website via servers that closet to them.
- Decreased site crashes when you have pikes of traffic that your server cannot handle.
- Better user experience as your site load super fast for users.
So implementing HTTP/2 can have that ever so small speed increase and additional security protection. However applying it is sometimes quite another matter depending on which method your employ. It can be relatively simple or pretty complicated. In either case its a recommended option to implement…
Advanced Step #2: Implement HSTS Directive
Although you have now implemented SSL to be used for your connections it still somewhat insecure.
In the above steps, you redirected any incoming HTTP connections to your website with a 301 redirect. Your website SSL connection relies on the 301 redirect from HTTP to HTTPS. This presents a small window of opportunity for a potential MITM (man in the middle) attack or eavesdroppers to hijack your SSL connection which may lead to data being stolen or intercepted!
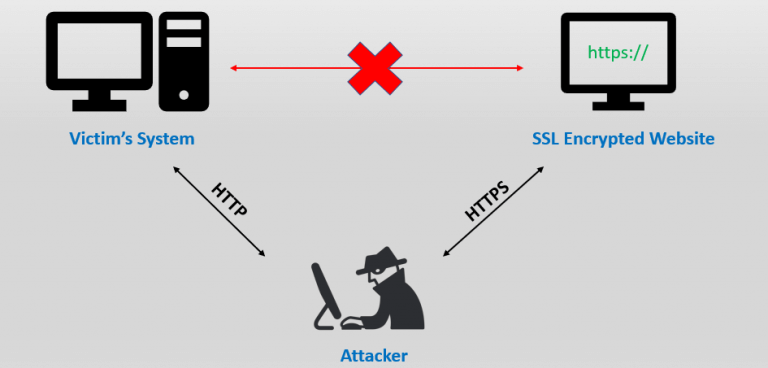
Implementing an SSL certificate on its own for your domain is not enough. Potential MITM attacks will still be able to access your website cookies, files etc. and may even be able to force a redirection to there site during that small window of opportunity.
The simple solution is to deploy HSTS which stands for HTTP Strict Transport Security. It’s a web server directive that informs user agents and browsers to force connections over HTTPS disregarding any calls to load information over HTTP calls. This type of directive is sent at the very beginning of a connection with a browser or user agent.

By installing an HSTS header it will be nearly impossible for potential hackers and eavesdroppers to gather any information from your site as all connections are forced via HTTPS from the very beginning.
The requirements to be met to apply HSTS are as follows:
- A valid SSL certificate is required.
- 301 redirection of all HTTP website URL’s to your HTTPS version.
- HSTS header must be served from the base domain.
- The WWW and non-WWW domain variants must be covered by your SSL certificate.
- A minimum MAX-AGE limit must be specified of at least 10886400 seconds or 18 Weeks.
- The preload directive must be specified in your directive.
- You should also include the includeSubDomains in your directive.
A recommendation before applying the MAX-AGE limit; set it as low as possible until you are happy with the outcome. You can then increase it to the minimum required limit. This will allow you to correct any issues beforehand. In the code example below we have set the limit to 300 to allow you to test the setup prior to increasing it to the minimum limit specified above.
The code directive you need to implement depends on the type of server you are hosted on:
Apache-based web servers
Simply add the following directive into the top level .htaccess file in either public_html or document root level of your site:1 2 | Apache .htaccess Code Directive Header always set Strict-Transport-Security "max-age=300; includeSubDomains; preload" |
NGINX web servers
The NGINX directive goes in your site.conf file which is usually located in your /etc/nginx/ folder:
1 2 | NGINX Code HSTS Directive add_header Strict-Transport-Security 'max-age=300; includeSubDomains; preload; always;' |
Once you have applied your HSTS directives as above then head over to the HSTS preload site and check your setup.
HSTS Implementation Errors
You may get some errors depending on the directives used:
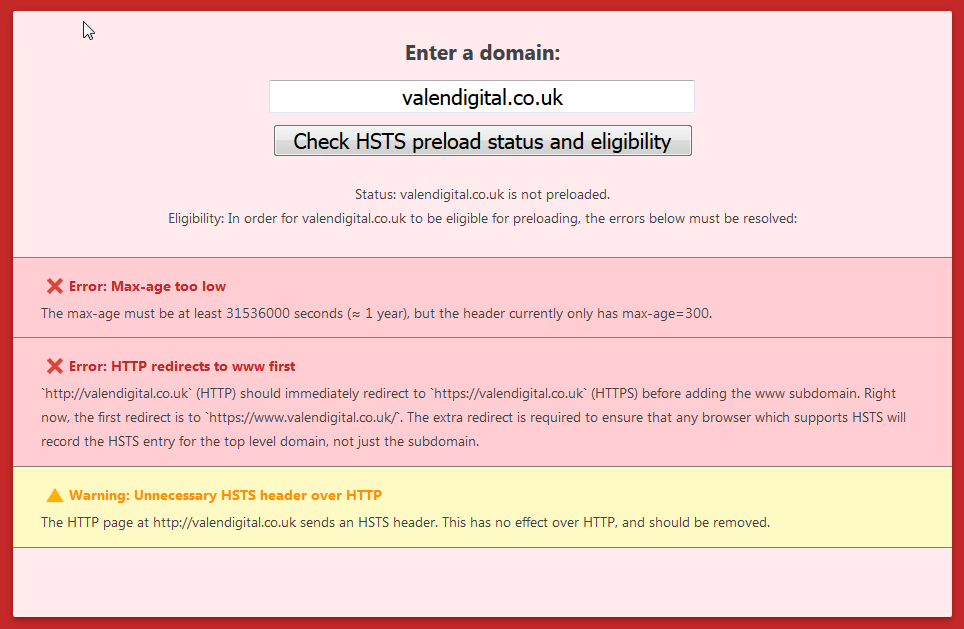
Let’s address those. The first error you get relates to the MAX-AGE limit specified in the directive.

As discussed; we are aware of this. This should be fine for testing purposes and when you are happy that everything is running smoothly you can increase the limit to the minimum recommended or to a value equal to 2 years. Whichever you prefer.
The second error relates to the way we 301 redirected your HTTP version of the site to HTTPS. A requirement for HSTS to work properly is to first redirect to the base domain (https://domain.co.uk) before redirecting to the WWW version of the domain. This ensures that browsers which support HSTS record the HSTS directive for the top level domain first.

If you don’t use the WWW version of the domain then this won’t be an issue for you.
So lets slightly modify the 301 redirect that we took in step #5:
1 2 3 | RewriteEngine On RewriteCond %{HTTPS} off RewriteRule ^(.*)$ https://example.co.uk/$1/ [L,R=301] |
As you can see we simply removed the WWW from the code. That will fix the error mention on the HSTS preload check.
Then to 301 redirect to the WWW version of your site (if that’s what you are using) we would add the following directly below that code:
1 2 3 | RewriteEngine On RewriteCond %{HTTP_HOST} !^www\. RewriteRule ^(.*)$ https://www.example.co.uk/$1 [L,R=301] |
Now HSTS will be recorded first for the top level domain and then your sub-domain (WWW version). One thing to note here is that this way of implementing HSTS does create a chained redirect. So you will have 3+ 301 redirects in place to the correct version of your website.
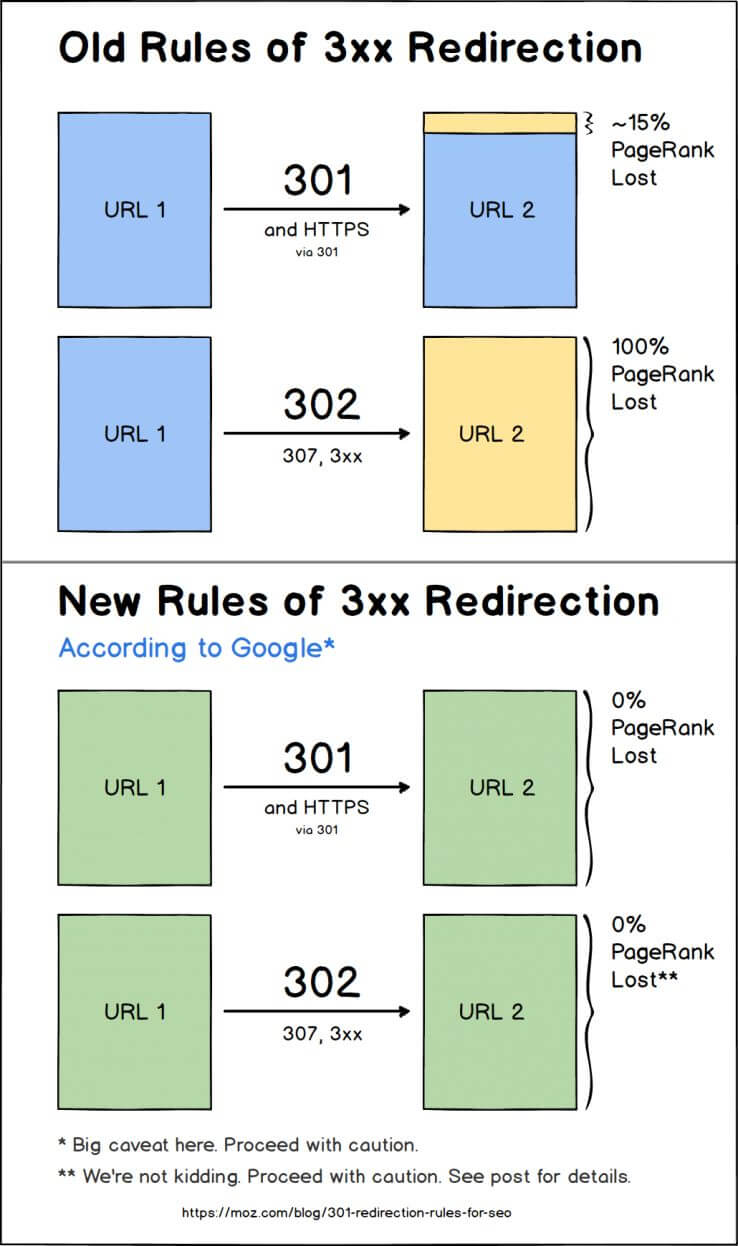
This can sometimes be an issue when you have an aged website that has lots of inbound links pointing to it. Prior to 2016 Google’s, Matt Cutts confirmed that a 301 redirect lost approximately 15% of its power:
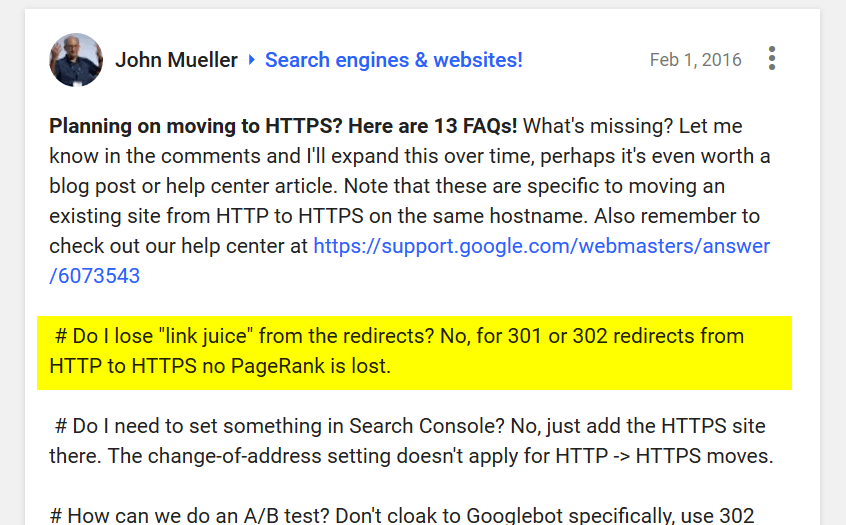
However, as Google wanted website owners to adopt the change to migrate to HTTPS in 2016 John Muller from the Google team announced that no power or PageRank (as they term it) is lost in a 301 redirection.
The following image represents the old and new rules for 301 redirects according to Google:
Last but not least the third error in the yellow box:

This simply means that a header was being sent via the HTTP version of the website URL. To correct this we simply need to add the following at the end of the HSTS directive that we used above: env=HTTPS so your directive will now look like this:
1 2 | Apache .htaccess Code Directive Header always set Strict-Transport-Security "max-age=300; includeSubDomains; preload" env=HTTPS |
UPDATE JULY 2021 – Depending on your web hosting environment you may not be able to use the env=HTTPS variable as shown above. Worse still you may use it but the HSTS check comes back as missing headers. To correct this you can use the following instead: “expr=%{HTTPS} == ‘on'”.
Your new line if you use the above will look similar to this:
1 2 | Updated Apache .htaccess Code Directive Header always set Strict-Transport-Security "max-age=30536000; includeSubDomains; preload" "expr=%{HTTPS} == 'on'" |
There are 2 things to take note here. First is that the ‘always’ argument is required in order to set the header on the canonical non-www to www (on HTTPS) redirect response (a non-200 response code).
Secondly the max-age specified above is a little below the required value that HSTS preload requires (as we advised above once you are happy with your settings then you should update this value).
When you have corrected all the errors head back over to the HTST preload website to re-check your installation. If everything is good you should get a message as follows:
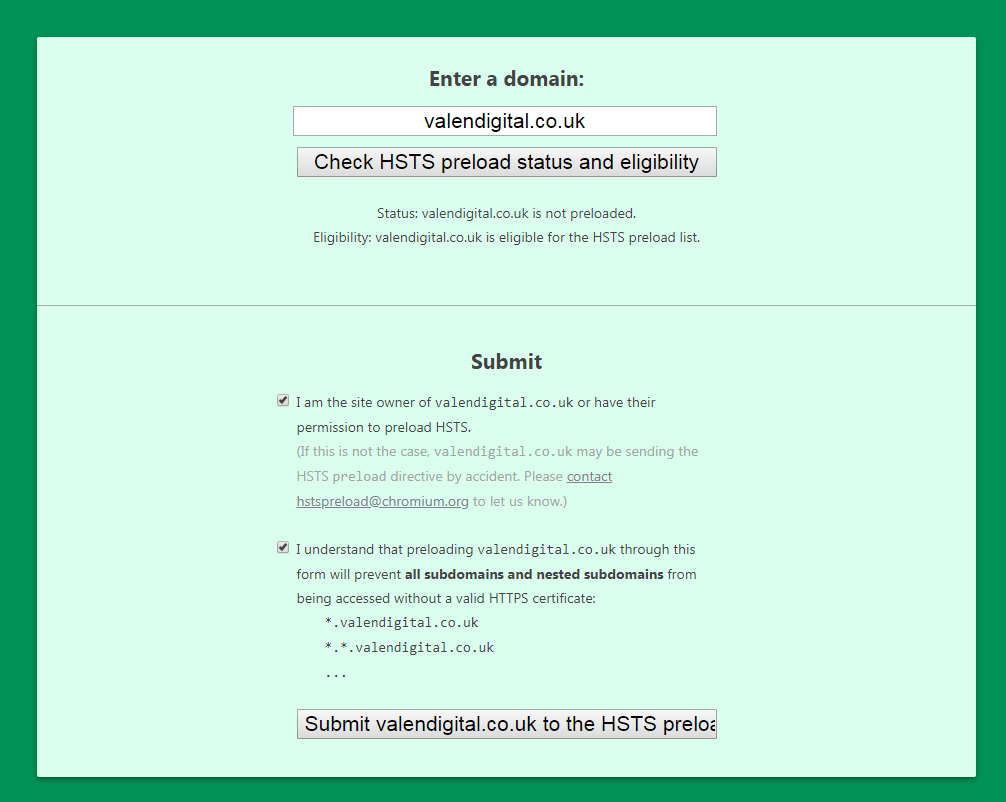
That means that you have a successful install of the HSTS directive. You will now be given the option to submit your site to be preloaded in browsers (which is why we included the preload command in the directive above as per point 6).
We would recommend that you don’t submit your site to the preload list until you are entirely satisfied with the results and recommend that you wait a minimum of 6 months before doing so. Have a look below at some of the disadvantages before proceeding even after 6 months!
HSTS potential disadvantages
Implementing HSTS does have some negative aspects to it. Some of the disadvantages are as follows:
- Once implemented, SSL certificate errors can no longer be bypassed in a browser (not sure why you would want to!).
- Moving back to HTTP (again once implemented why would you want to?) is very difficult. You could amend the above directives to reduce your MAX-AGE limit to say 0 but ultimately you would have to wait for a user to revisit your website.
- You have potentially other subdomains used in a corporate network that are based on HTTP. If the includeSubDomains command into the directive then this could potentially lead to a serious issue with HTTP setups. You may have an Intranet or DEV URLs for testing that will no longer be accessible via HTTP.
- Data that is transmitted via HTTP will no longer work on an HSTS enabled site. Ensure that there is no data being transmitted via HTTP but only via HTTPS.
- Once you are in the browser preload list it’s near enough impossible to get removed from the list. It takes approx 3 months to get removed from the chrome browser however that’s not even guaranteed.
Implementing HSTS is a good thing, however, make sure you understand all the risks involved and read up on it thoroughly. Make sure you are fully aware and happy with what HSTS is before implementing it. Test, test and test!
Advanced Step #3: PCI/DSS & SSL check
Now that you have installed SSL on your website head over to: ssllabs.com/ssltest/ and stick in your URL (use ether the WWW or non-WWW version of your site). That will show you an analysis of how well SSL is implemented on your website.
A bog standard site should get above the B rating. Ideally you want an A+ rating
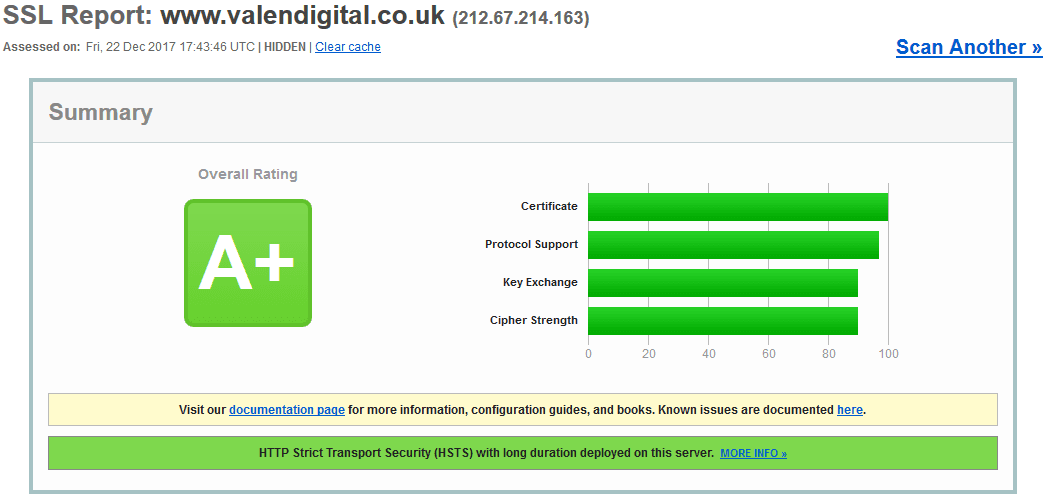
If you’re falling short then you can further improve your rating but most importantly your SSL security by disabling a few items as directed to by the SSL check and information it provides.
Now you need access to your server for this and generally the settings that you need to update are not available on shared hosting. Most good hosting providers have already implemented this, so you should be good to go.
If not and you have access to your server then you need to ensure that your only using TLS 1.2 (1.1 is optional) and that you have strict rules set.
It takes a bit of faffing around to get the best result and can be a pain in the butt to do. We found the following to be a good working SSL configuration:
1 2 3 | SSLProtocol all -SSLv2 -SSLv3 SSLHonorCipherOrder on SSLCipherSuite "EECDH+ECDSA+AESGCM EECDH+aRSA+AESGCM EECDH+ECDSA+SHA384 EECDH+ECDSA+SHA256 EECDH+aRSA+SHA384 EECDH+aRSA+SHA256 EECDH+aRSA+RC4 EECDH EDH+aRSA RC4 !aNULL !eNULL !LOW !3DES !MD5 !EXP !PSK !SRP !DSS" |
Add that code into your Apache configuration section which you can do via WHM or SSH. It needs to go into the pre_main_global.conf file for ALL versions.
The following can go into the ,em>pre_virtualhost_global.conf again for all versions:
1 2 3 4 5 | <IfModule mod_fcgid.c> FcgidMaxRequestLen 1073741824 </IfModule> SSLProtocol +TLSv1.1 +TLSv1.2 SSLHonorCipherOrder on |
Those 2 combined will allow you to pass any PCI DSS security that you may need for your ecommerce merchant accounts and also give you an A (A+) rating on the SSL check.
Chapter 6Conclusion
Congratulations! If you have followed all the steps then you have successfully migrated your website from HTTP to HTTPS.
Your website will now benefit from secure SSL connections that will prevent hackers and eavesdroppers. You will have a much faster site compared to standard HTTP websites (and those still using http/1). Your website will now also be complaint for PCI/DSS which is a requirement for most ecommerce websites.
To top put ‘icing on the cake’ all your website URL’s will be intact and be correctly redirecting to the SSL version saving you any link juice you may have acquired over time!
Read on to see the result we achieved for a migration we completed (your results should be similar).
We implemented an SSL and migrated a big website from HTTP to HTTPS way back at the beginning of 2016 and kept a close eye on the organic traffic.
Many other websites and even agencies migrating clients to SSL experienced a drops in their organic traffic and search result positions.
However if you followed all the steps carefully above you should see something like this:
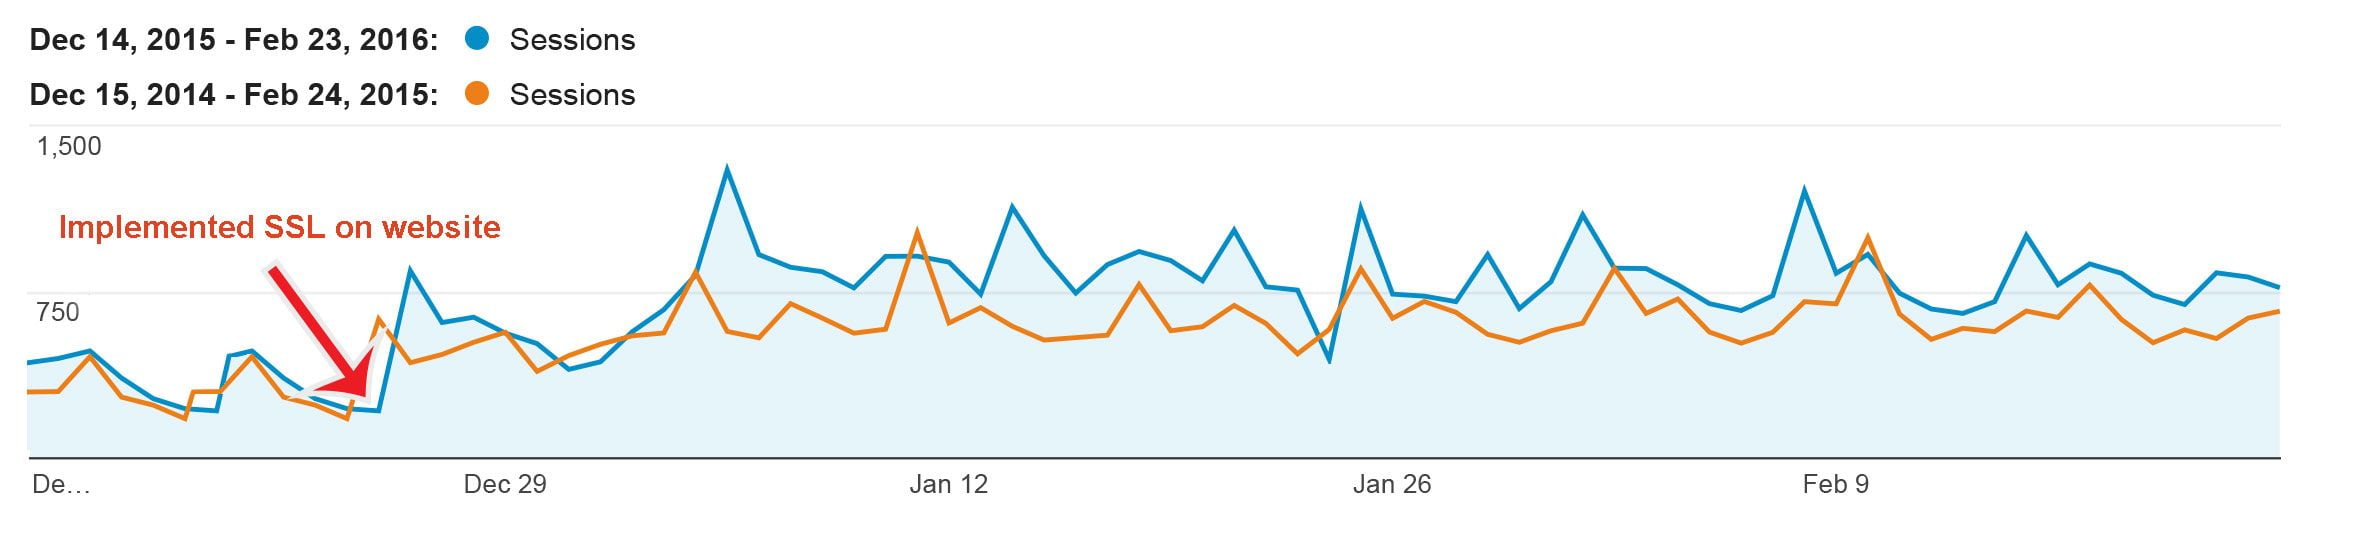
The SSL implementation we completed at the beginning of January 2016 for an ecommerce site which had well over 100,000 URLs and migrating from HTTP to HTTPS we didn’t lose any organic search traffic at all. In fact because we added an EV SSL certificate and ensured we 301 redirected all the URLs properly and took the steps outlined above the organic search traffic, CTR and conversions actually increased. Job well done :)
We hope that this post has been helpful for you and allows you to easily implement your SSL and migrate your website to HTTPS effectively.
We would love to hear your comments below and of course, this guide is for you — so please ask questions and leave feedback so that we can improve it!
